
An appliance garage is one of the best ways to keep your kitchen counters clear and organized. That valuable countertop space is often lost to a collection of daily-use gadgets: the toaster, the blender, the stand mixer, and the ever-present coffee maker. While essential, these items can create visual noise, making even a clean kitchen feel cluttered. An appliance garage solves this problem elegantly, hiding your tools away while keeping them plugged in and ready to use at a moment’s notice. It’s a simple concept that transforms your kitchen’s form and function.
For years, I’ve been helping homeowners design and organize their kitchens to be both beautiful and practical. My name is Edom Clark, and I’ve spent the last five years specializing in kitchen storage solutions that truly work for modern life. I’ve seen firsthand how a well-planned storage feature, like an appliance garage, can completely change how a person feels about their kitchen. It’s not just about hiding things; it’s about creating a calm, intentional space. I believe a great kitchen design anticipates your needs, and that’s what we’ll explore here—how to design an appliance garage that isn’t just a box, but a seamless part of your daily routine.
What is an Appliance Garage and Why Do You Need One?
At its core, an appliance garage is a dedicated storage cabinet that sits on your countertop, typically beneath your upper cabinets. It’s designed to house small appliances, concealing them behind a door that opens to grant you easy access. Think of it as a designated “parking spot” for your toaster and coffee maker, keeping them off the main “road” of your counter.
The benefits go far beyond just a tidy appearance. Let’s break it down:
- Reclaim Your Counter Space: This is the most obvious win. By moving appliances off your main prep areas, you gain valuable, uninterrupted space for chopping, mixing, and plating.
- Create Visual Harmony: A smooth, unbroken line of cabinetry is calming and aesthetically pleasing. Appliance garages help achieve that clean, minimalist look that is popular in modern kitchen design.
- Protect Your Appliances: Storing appliances in a garage protects them from dust, grease splatters, and other kitchen grime, potentially extending their lifespan and keeping them cleaner.
- Streamline Your Routine: With outlets installed inside, your appliances are always plugged in and ready. Your morning coffee routine becomes a simple act of opening a door, not dragging a machine out from a low cabinet.
Choosing the Right Door Style for Your Kitchen
The door is the most defining feature of your appliance garage. It dictates the look, the accessibility, and how the unit functions within your space. Each style has its own set of advantages and challenges.
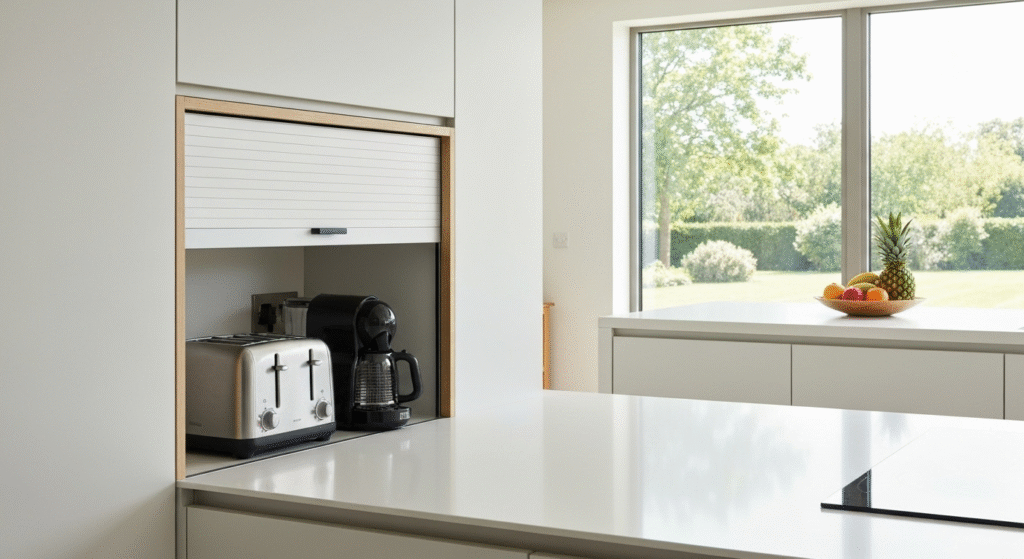
Tambour Doors (Roll-Up)
A tambour door is made of narrow horizontal slats linked together that slide along a track, rolling up and out of sight like an old roll-top desk. This is a classic and highly functional choice.
A client I worked with last year had very limited space next to their refrigerator. A swing-out door would have constantly bumped into the fridge handle. We opted for a custom wooden tambour door that matched their oak cabinets perfectly. It disappeared upwards, requiring zero side clearance and solving the problem instantly.
| Pros | Cons |
| Requires no swing-out clearance. | The track mechanism can be complex to install. |
| Classic, textured look. | Can be more expensive than standard doors. |
| Can be left open without being in the way. | The slats can be harder to clean than a flat door. |
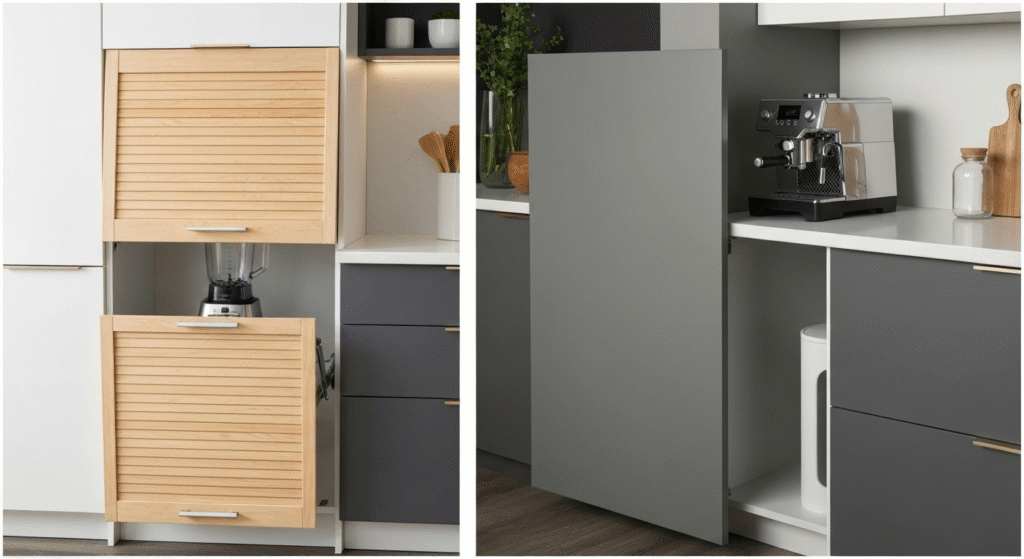
Lift-Up Doors (Flip-Up)
These single-panel doors are hinged at the top and lift upward, often held in place by specialized hardware like gas struts or friction hinges. They offer a very modern, seamless look when closed.
| Pros | Cons |
| Provides completely unobstructed access when open. | Requires vertical clearance to open fully. |
| Modern and sleek appearance. | Hardware can be costly and requires precise installation. |
| Easy to clean flat surface. | The door can be in the way if left open. |
Pocket Doors (Retracting)
Pocket doors are hinged like standard cabinet doors but are mounted on slides. This allows them to open 90 degrees and then slide back into a recess in the cabinet walls, disappearing completely. This style offers the best of both worlds: a traditional look with hideaway functionality.
| Pros | Cons |
| Disappears completely for full access. | The pocket mechanism requires a wider cabinet. |
| Offers a clean, integrated look when closed. | Most complex and expensive hardware to install. |
| Can match your other cabinet doors perfectly. | Requires more depth to accommodate the door recess. |
Sliding Doors (Bypass)
Sliding doors work on a track system, with two or more doors sliding past one another. This is less common for appliance garages but can be a stylish solution for wider, custom units.
| Pros | Cons |
| Requires no swing-out clearance. | You can only access one half of the garage at a time. |
| Can create a unique, modern farmhouse or industrial look. | Not ideal for accessing larger appliances. |
| Simple mechanism is easy to install. | Doors can rattle in the tracks if not fitted properly. |
Critical Design Details Many People Forget
A successful appliance garage is more than just a box with a door. The internal dimensions and technical details are what make it truly functional and, more importantly, safe. Ignoring these details is a common mistake in DIY projects.
Getting the Depth and Height Right
Before you build or buy, you must measure your appliances. Don’t just guess.
- Identify the Residents: Decide which appliances will live in the garage. Is it just a toaster, or will it house your tall stand mixer or a feature-rich coffee machine?
- Measure Everything: Measure the width, depth, and height of your largest appliance. Remember to account for its plug and cord sticking out the back. A stand mixer might be 14 inches deep, but its cord could add another inch or two.
- Add Buffer Space: Add at least 1-2 inches of clearance around all sides (width and depth) and at the top. This makes it easier to move appliances in and out and helps with air circulation.
A common oversight is failing to account for the height of a blender with its pitcher attached or a coffee maker with the lid open for refilling. I advise clients to measure their appliances in their “in-use” state to avoid surprises.
Ventilation Is Non-Negotiable
This is the single most important safety consideration. Appliances like toasters, toaster ovens, and coffee makers produce heat and steam. Trapping that inside a small, enclosed box is a recipe for disaster. It can damage the cabinet, warp the finish, create a fire hazard, and shorten the life of your appliance.
Here are proven ventilation strategies:
- The Back Gap: The simplest method is to design the garage with no back panel or a back panel that is cut a few inches short at the top and bottom. This allows heat to escape into the wall cavity behind the cabinet.
- Vented Grilles: Install small, decorative vent grilles into the top, bottom, or back panel of the garage. These allow for passive airflow, letting cool air in and hot air out.
- Perforated Panels: Using a perforated metal or hardboard back panel is another excellent way to ensure constant air circulation.
I once consulted on a kitchen remodel where the homeowner’s custom-built appliance garage had caused the finish on the upper cabinet to bubble and peel. The culprit? Daily steam from their espresso machine with nowhere to go. We fixed it by drilling a series of holes in the top panel and covering them with a sleek aluminum grille, solving the problem while maintaining a clean look.
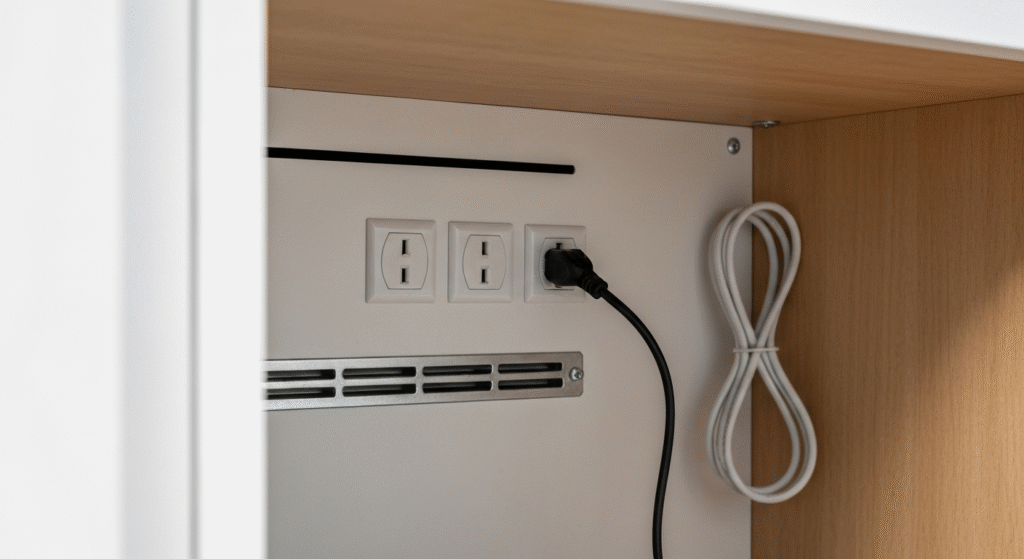
Planning for Power
An appliance garage is useless without electricity. Outlets should be planned from the beginning, not added as an afterthought.
- Install Outlets Inside: Have an electrician install a duplex or quad outlet on the back wall of the garage. This keeps cords tidy and out of sight.
- Use GFCI Outlets: For any outlet near a sink or water source, building codes require a Ground Fault Circuit Interrupter (GFCI) outlet for safety.
- Consider a Power Strip: For maximum flexibility, a small, high-quality power strip mounted to the back wall can be a great solution, especially if you have several appliances.
- Safety Cut-Off Switch: For ultimate peace of mind, you can install a switch that automatically cuts power to the outlets when the garage door is closed. This ensures a heat-producing appliance like a toaster can never be operated accidentally inside the enclosed space.
Here is a quick reference table for your design blueprint:
| Feature | Recommended Specification | Reason |
| Interior Depth | Largest appliance depth + 2 inches | Allows for cord space and airflow. |
| Interior Height | Tallest appliance height + 2 inches | Provides clearance for removal. |
| Interior Width | Total width of appliances + 3 inches | Eases access and prevents crowding. |
| Ventilation | 1-2 inch gap at top/back OR vent grilles | Prevents heat/steam buildup and fire risk. |
| Electrical | 1-2 GFCI-protected outlets | Safe, convenient, and code-compliant. |
Placement and Integration in Your Kitchen
Where you put your appliance garage is just as important as how you build it. The goal is to place it where it makes the most sense for your kitchen workflow.
The Classic Countertop Corner
The awkward L-shaped corner of a kitchen counter is often underutilized space. This makes it a perfect location for an angled or straight-back appliance garage. It tucks neatly into the corner, turning a dead zone into a highly functional storage hub.
The Straight Run Integration
Placing an appliance garage at the end of a straight run of cabinets creates a clean, intentional “bookend” effect. It works best when placed next to a taller element like a refrigerator or a pantry cabinet, which helps it look visually anchored.
The Dedicated Breakfast Station
For a truly streamlined morning, consider designing a full-height pantry cabinet to act as a “breakfast station.” The lower section can serve as an appliance garage for your coffee maker, toaster, and blender, with mugs, bowls, and cereals stored on the shelves directly above. You open one set of doors to access everything you need for your morning meal. This is a fantastic solution for busy families.
Frequently Asked Questions (FAQs)
1. Can I add an appliance garage to my existing kitchen cabinets?
Yes, absolutely. You can order a custom-sized unit from a cabinet maker to match your existing style, or you can purchase a standalone appliance garage online or from a home improvement store. The key is to ensure the color and door style complement your current cabinetry.
2. What is the best material for a tambour door?
Wood is the most traditional and popular choice, as it can be stained or painted to match cabinets. However, stainless steel or aluminum tambour doors are also available and offer a sleek, modern, and durable alternative that is very easy to clean.
3. Do I need a professional to install an appliance garage?
For a simple, standalone unit, a confident DIYer can often handle the installation. However, if your project involves electrical work (installing new outlets) or complex door hardware (like pocket or lift-up doors), it is highly recommended to hire a professional carpenter and a licensed electrician to ensure it is done safely and correctly.
4. How much do appliance garages cost?
The cost varies widely. A simple, pre-built MDF unit can cost as little as $150-$300. A custom-built garage made to match your cabinetry with high-end hardware, like pocket doors, can range from $500 to over $1,500, not including electrical work.
Conclusion
An appliance garage is more than just a clever storage trick; it’s a strategic design choice that brings order, beauty, and efficiency to the heart of your home. By thoughtfully choosing a door style and paying close attention to the critical details of depth, power, and especially ventilation, you can create a feature that you’ll appreciate every single day. Taking the time to plan it right will transform your cluttered countertop into a clean, expansive workspace, proving that the best designs are the ones that make daily life simpler and more enjoyable.

Hi, I’m Edom Clark, the creator and writer behind Taanzo. For the past five years, I’ve been exploring and writing about kitchen storage and home organization. My experience comes from both personal experimentation and hands-on observation — testing different storage systems, materials, and layouts to find what truly works in everyday homes. Over time, I’ve come to appreciate how small adjustments in storage can transform the way we cook, clean, and even enjoy time in the kitchen. Through Taanzo, I aim to share that knowledge in a way that’s honest, approachable, and genuinely useful.

