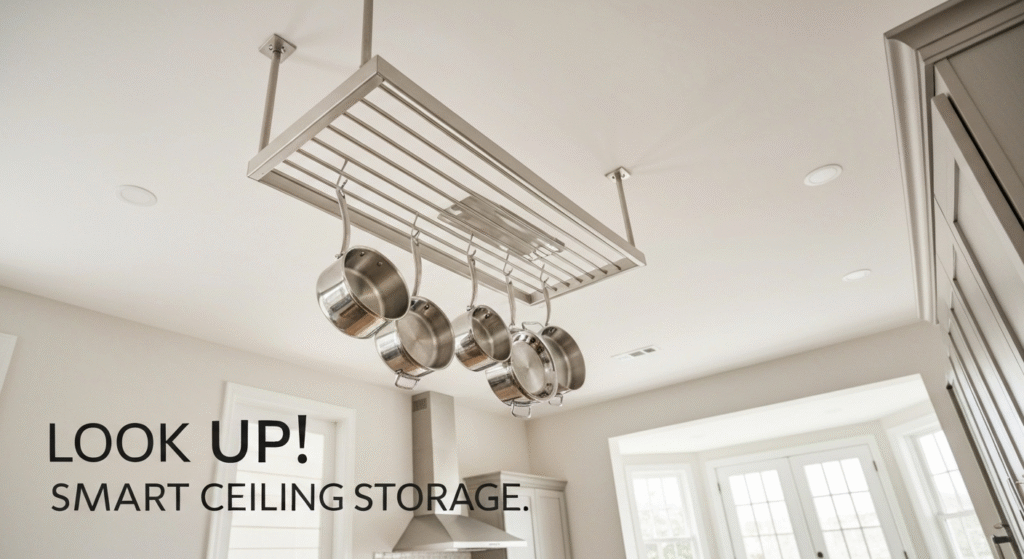
Ceiling-mounted racks offer a fantastic way to increase kitchen storage, especially when cabinet and counter space is limited. But there’s a common fear that holds people back: the worry that a large object hanging from the ceiling will dominate the room, making it feel crowded, dark, and visually heavy. This is a valid concern, particularly in modern homes designed around open, airy concepts. A poorly chosen or badly placed rack can shrink a space in an instant. But when done right, a ceiling rack doesn’t just add storage; it adds character and becomes a design feature that enhances the room’s sense of height and function.
Hello! I’m Edom Clark. For years, I’ve been helping people solve their kitchen storage puzzles, and my passion lies in finding solutions that are both practical and beautiful. I’ve spent countless hours in different kitchens, seeing firsthand how the right storage can transform not just the room, but how people feel and work within it. Through this hands-on work, I’ve learned that the most successful designs are about balance—blending function with the unique flow and light of a space. My goal is to share what I’ve learned, moving beyond generic advice to give you the clear, real-world insights needed to make your kitchen work better for you.
Why Most Ceiling Racks Fail (and How to Make Yours a Success)
Before we get into the solution, let’s break down the problem. Why do some ceiling racks look so fantastic in a showroom but feel so wrong in a real home? After working in this field for over five years, I’ve seen the same mistakes repeated. The issue usually isn’t the rack itself, but a misunderstanding of how it interacts with the space around it.
Common pitfalls include:
- Choosing a rack that’s too bulky: A heavy, dark, or overly ornate rack will absorb light and create a visual barrier. It becomes the first thing you see, effectively lowering the ceiling.
- Hanging it too low: This is a classic error. A low-hanging rack is not only a physical hazard for taller individuals but also chops the room in half visually, interrupting sightlines and making the space feel cramped.
- Ignoring the room’s scale: A massive rack in a small kitchen is a recipe for disaster. Conversely, a tiny rack in a large, high-ceilinged room can look lost and insignificant.
- Poor placement: Placing a rack where it blocks a primary light source, like a window or key light fixture, will instantly make the kitchen feel darker and smaller.
The secret to success is to stop thinking of the rack as just a storage hook and start seeing it as an architectural element. It must complement the room, not compete with it.
The Golden Rule: Mastering the Balance Ratios
This is where we move past the basic advice you find in most installation guides. The most important concept for keeping a room feeling open is understanding the relationship between the rack’s size, its height, and its visual weight. It’s a delicate balancing act.
The Height-to-Width Ratio
The wider and more substantial your rack is, the higher it needs to be mounted to avoid feeling oppressive. A slim, single-bar rack can hang a bit lower without issue, but a wide, rectangular grid rack needs more vertical clearance to allow your eyes to see the space “through” and “around” it.
Here’s a practical way to think about it. Standard advice often suggests hanging a pot rack so its base is about 30-36 inches above a countertop. This is a good starting point, but it doesn’t account for the rack’s visual presence. My guiding principle is to adjust based on width. For every 6 inches of width the rack has, I consider raising it an additional inch or two above that standard baseline, as long as it remains accessible. This small adjustment makes a huge difference in preserving the room’s open feel.
| Rack Style/Width | Visual Impact | Suggested Height Adjustment |
| Single-Bar Rack (2-3 inches wide) | Low | Standard height is often fine. |
| Linear Rack (4-6 inches wide) | Low-Medium | Consider adding 1-2 inches to standard height. |
| Grid Rack (18-24 inches wide) | Medium-High | Add 3-5 inches to standard height. |
| Solid Shelf Rack (12+ inches wide) | Very High | Mount as high as possible while keeping it functional. |
The Visual Weight Illusion
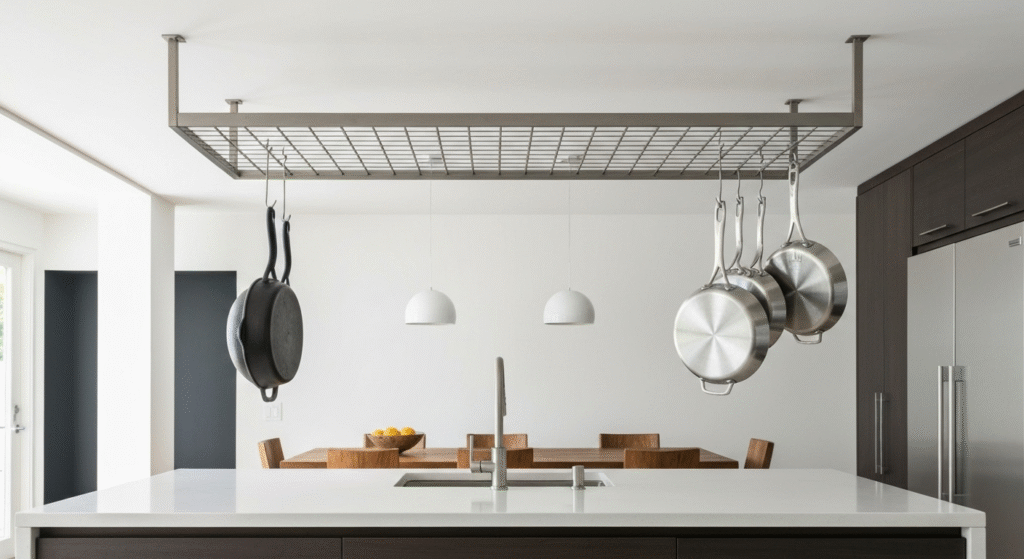
Visual weight isn’t about how many pounds the rack can hold; it’s about how heavy it looks. A rack made of thick, black wrought iron has a high visual weight. One made from thin, brushed stainless steel has a low visual weight. This illusion is critical in open-concept kitchens.
A few years ago, a client with a beautiful loft kitchen wanted a large pot rack over their island. The ceilings were high, but the kitchen was part of one large living area, so keeping it from feeling cluttered was a top priority. They initially picked a heavy, dark bronze rack. During our consultation, I pointed out how its solid color would create a dark rectangle in the middle of the room. We switched to a rack with a minimalist, open-frame design in a light, brushed nickel finish. The effect was immediate. The new rack reflected light instead of absorbing it, and its thin profile blended seamlessly with their stainless steel appliances. It provided the same amount of storage but with half the visual footprint.
When styling your rack, apply the same principle. Place your largest, darkest pots and pans toward the center and your smaller, shinier items like stainless steel saucepans toward the edges. This concentrates the visual weight in the middle and lets the rack’s perimeter feel lighter and more open.
Choosing the Right Rack for an Open Feel
With the principles of balance in mind, let’s look at the hardware itself. The material and style you choose are just as important as where you place it.
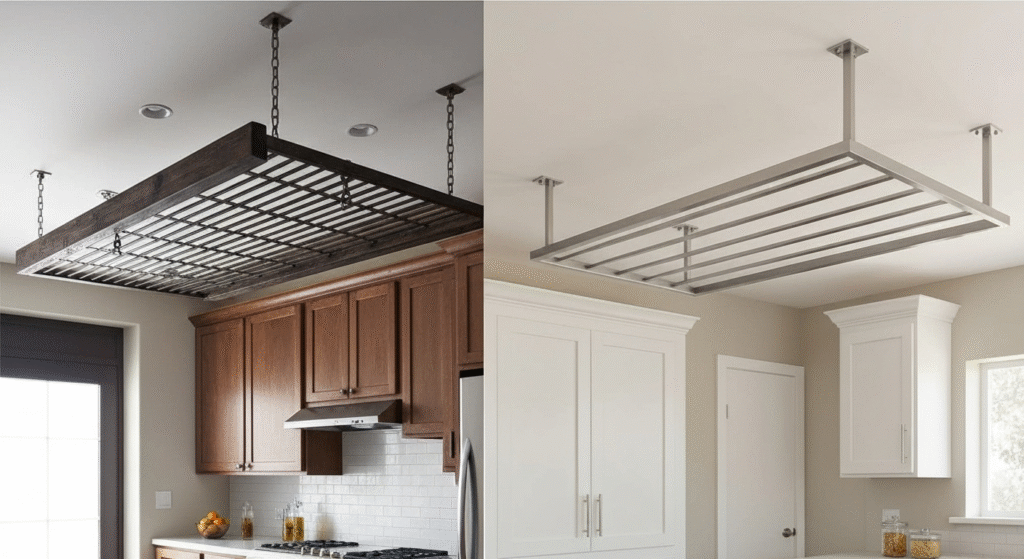
Material Matters: From Airy Metals to Minimalist Wood
The material of your rack dictates its visual weight. To maintain a sense of spaciousness, your best bets are materials that are either reflective or have a thin profile.
- Brushed Stainless Steel or Nickel: These are excellent choices. Their metallic sheen reflects ambient light, which helps them blend into the ceiling and feel less solid. They coordinate well with most modern appliances.
- Polished Copper or Brass: While these have more color, their high shine also reflects light. They can add a touch of warmth and elegance without feeling heavy, especially in a linear or single-bar design.
- Minimalist Wood: A rack made from a light-colored wood like maple or ash, with a simple and thin frame, can work well. It adds a natural, organic feel. Avoid thick, dark-stained woods, which carry a lot of visual weight.
- Wrought Iron (with caution): Black iron is very popular but also visually the heaviest. If you love this look, opt for the thinnest, most delicate design possible. A simple, forged bar is much better than a complex, scrolling grid.
Style and Structure: Open Frames vs. Solid Shelves
The structure of the rack is paramount. You want air and light to pass through it easily.
- Single-Bar or Linear Racks: These are the champions of minimalist storage. They consist of a single bar or a long, narrow frame with hooks. They offer a clean line and have the lowest possible visual impact, making them ideal for smaller kitchens or lower ceilings.
- Open-Grid Racks: These are very popular for their versatility, allowing you to hang pots from any point. To keep them from feeling heavy, choose a grid with thin bars and a wide-open weave. The more “empty space” you can see through the grid, the better.
- Solid Shelving Racks: These offer the most storage, allowing you to place items on top as well as hang things below. However, they are also the most visually dominant because they create a solid plane that blocks light and sightlines. These are best reserved for kitchens with very high ceilings or in spaces where they are placed against a wall rather than over a central island.
Strategic Placement for Maximum Space and Light
Where you hang your rack can make or break the entire project. The goal is to integrate it into the kitchen’s flow, not make it an obstacle.
Centering Over an Island vs. Offsetting
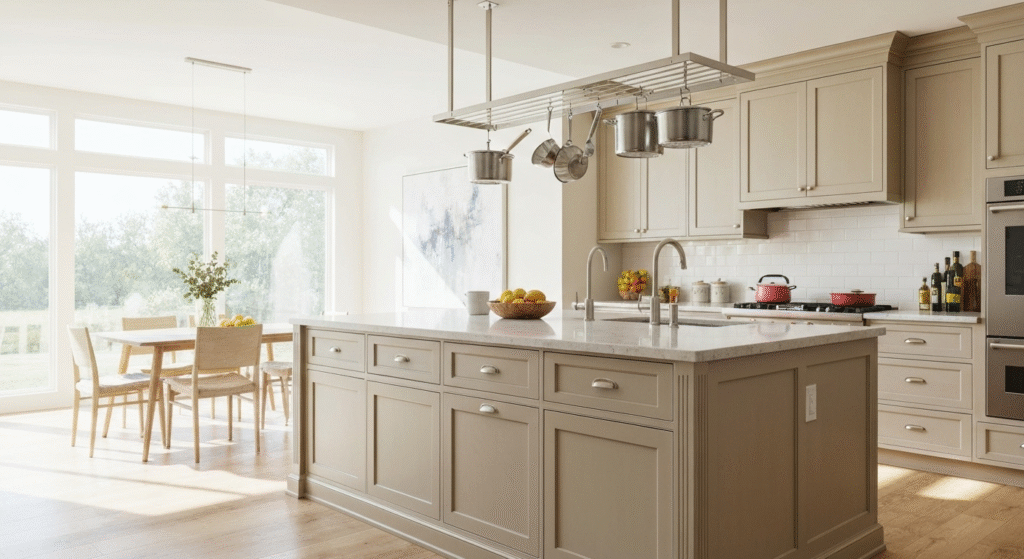
The default placement is centered directly over a kitchen island. This creates a pleasing symmetry and keeps cookware within easy reach of the prep space. It’s a classic for a reason. However, if your island is very large or your ceilings are standard height, a centered rack can feel like a lid on the workspace.
An alternative is to offset the rack. Hanging it slightly to one side of the island’s centerline can create a more dynamic and less formal look. It breaks up the symmetry and can feel more intentional and less “out-of-the-box.” Another great option is to place a linear rack along the long axis of the island but positioned over the half furthest from the main seating area. This keeps it out of the direct sightline of guests and defines the cooking zone.
Working with Natural Light
This is a simple but crucial rule: never hang a rack where it will block a significant portion of a window. It will cast a shadow over your workspace and make the entire room feel darker. If you have a window over your sink, for example, ensure the rack is positioned far enough away that it doesn’t impede the incoming light. In some cases, a well-placed rack with an open frame can actually frame a view nicely, but this requires careful planning.
Installation Insights: Beyond the Instruction Manual
Proper installation is about more than just safety; it’s about getting the details right to achieve that professional, integrated look.
Finding Joists is Non-Negotiable
This cannot be stressed enough. A ceiling rack loaded with cast iron pans can weigh over 100 pounds. You must anchor it directly into the wooden ceiling joists. Drywall anchors are not sufficient and will fail. Use a stud finder to locate the joists and plan your installation points accordingly. If the joists don’t align perfectly with your desired rack position, you may need to install a cross-brace in the attic or use a mounting board painted to match the ceiling. Safety is the top priority.
The “Dry Run” Technique for Perfect Placement
Before you drill a single hole, you need to visualize the rack in place. I have a go-to technique I use with every client. We create a template of the rack’s footprint using cardboard or by outlining it with painter’s tape on the ceiling. Then, we hang lightweight strings down to the height of the lowest-hanging pot.
This “dry run” does a few things:
- It allows you to see the exact visual space the rack will occupy.
- You can walk around it, sit at the island, and check sightlines from every angle.
- It confirms you have adequate headroom. My rule is that the bottom of the lowest item should be at least 6 feet 5 inches from the floor to be safe for most people.
This simple step has prevented countless installation regrets. It takes an extra 30 minutes but ensures the placement is perfect before it’s permanent.
FAQs: Quick Answers to Common Questions
1. How much weight can a ceiling-mounted rack typically hold?
This depends entirely on the rack’s construction and, more importantly, how it’s installed. When anchored correctly into ceiling joists, many racks are rated for 50 to 100 pounds. Always check the manufacturer’s specifications and never overload it.
2. What is the ideal height to hang a kitchen pot rack?
There is no single magic number, as it depends on your ceiling height and your own height. A good starting range is to have the base of the rack 30-36 inches above your island or countertop. The most important rule is ensuring the lowest-hanging item doesn’t obstruct views or create a head-bumping hazard.
3. Can I install a ceiling rack if I have very low ceilings?
If your ceilings are under 8 feet, a hanging rack can be challenging and often makes the room feel smaller. In this case, consider a very minimalist single-bar rack mounted as high as possible, or explore wall-mounted storage options instead to preserve that precious vertical space.
4. How do I clean a ceiling rack and the pots on it?
Kitchens produce airborne grease, which will eventually settle on your rack and pots. For regular maintenance, a weekly dusting is sufficient. For a deeper clean every few months, take everything down, wipe the rack with a degreasing cleaner appropriate for its material, and wash the pots. Storing only frequently used pots helps minimize dust buildup.
Conclusion
A ceiling-mounted rack doesn’t have to be a bulky, room-shrinking addition to your kitchen. By thoughtfully considering the principles of visual balance, choosing the right materials and style, and being strategic about placement, you can add a significant amount of storage while enhancing your kitchen’s open and airy feel. It’s about seeing the rack not just as a piece of hardware, but as a key component of your kitchen’s design. With the right approach, you can look up and love the space you’ve created—a space that is both highly functional and beautifully open.

Hi, I’m Edom Clark, the creator and writer behind Taanzo. For the past five years, I’ve been exploring and writing about kitchen storage and home organization. My experience comes from both personal experimentation and hands-on observation — testing different storage systems, materials, and layouts to find what truly works in everyday homes. Over time, I’ve come to appreciate how small adjustments in storage can transform the way we cook, clean, and even enjoy time in the kitchen. Through Taanzo, I aim to share that knowledge in a way that’s honest, approachable, and genuinely useful.

