
An ergonomic drawer layout is one of the most powerful, yet overlooked, secrets to a faster and more enjoyable cooking experience. We often blame a lack of counter space or old appliances for our kitchen frustrations. But the real culprit is frequently the chaotic and illogical placement of our tools. Think about the last meal you cooked. How many times did you walk across the kitchen for a spatula, bend down to a low cabinet for a pot, or rummage through a cluttered drawer for a can opener? Each of these small, wasted movements adds up, turning a simple 30-minute meal into a 45-minute chore.
The truth is, your kitchen should work for you, not against you. By strategically organizing your drawers based on how you actually move and cook, you can create a seamless workflow. This isn’t about buying expensive organizers or undergoing a massive renovation. It’s about applying simple principles of ergonomics—the science of designing for efficiency and comfort—to the heart of your home. In this guide, we will break down how to map your kitchen’s layout, organize your drawers by zones and frequency of use, and finally reclaim your time and energy.
As a kitchen organization enthusiast, I’m Edom Clark. For years, I’ve been fascinated with the flow and function of home kitchens, exploring how simple changes can have a massive impact on our daily lives. My work isn’t just about making things look tidy; it’s about creating systems that reduce stress and make cooking feel less like a task and more like a creative outlet. Over the past five years, I’ve helped countless people transform their chaotic kitchens into models of efficiency, and the most common theme I’ve seen is that a smart drawer layout is the foundation of it all. I believe a well-organized kitchen is an accessible goal for everyone, and I’m passionate about sharing the practical steps to get there.
What Are Ergonomic Drawer Layouts, and Why Do They Matter?
In simple terms, an ergonomic drawer layout means placing your tools and equipment where they are most logical and comfortable to reach in relation to your tasks. It’s about minimizing physical strain—less bending, stretching, and walking—and mental load. You shouldn’t have to think about where your favorite pan is; your body should already know.
The core benefit is a dramatic increase in speed and efficiency. Imagine all your prep tools—knives, cutting boards, mixing bowls—within arm’s reach of your main counter space. Picture your most-used cooking utensils right next to the stove. This setup creates a natural, intuitive flow that can shave precious minutes off your meal prep every single day.
I once worked with a client who loved to cook but was constantly frustrated by his kitchen. He kept his spices in a beautiful rack across the room from the stove because it looked nice. During our consultation, we timed him making a simple omelet. He walked back and forth to that spice rack four times. We moved the most-used spices to a small top drawer right next to his stove. The next time he made an omelet, he finished two minutes faster, and more importantly, he felt calmer and more in control. That’s the power of ergonomics.
The Foundation: Mapping Your Kitchen’s Work Zones
Before you can organize a single drawer, you need to understand the geography of your kitchen. The most effective layouts are built around distinct work zones. While the classic “kitchen work triangle” (the path between the sink, stove, and refrigerator) is a good starting point, modern kitchens benefit from a more detailed zone-based approach.
Defining Your Primary Kitchen Zones
Most kitchens can be broken down into four or five key zones. Your goal is to store items where they are first used. By grouping tools by task, you create mini-workstations that eliminate unnecessary movement.
Here are the most common zones:
- Prep Zone: This is your primary counter space, usually between the sink and the stove. It’s where the magic of chopping, mixing, and assembling happens. The drawers and cabinets here are the most valuable real estate in your kitchen.
- Cooking Zone: The area immediately surrounding your stove, cooktop, and oven. This zone is for everything you need when heat is involved.
- Cleaning Zone: This area includes the sink, dishwasher, and trash/recycling bins. It’s dedicated to washing, drying, and waste disposal.
- Storage Zone: This covers the pantry and refrigerator where you store most of your food. It also includes drawers for food storage containers, wraps, and bags.
- Consumables Zone (Optional but Recommended): This is for everyday items like plates, bowls, glasses, and cutlery. It should be easily accessible from the dishwasher and the dining area.
The table below breaks down which items logically belong in each zone’s drawers.
| Kitchen Zone | Purpose | Ideal Drawer Contents |
| Prep Zone | Chopping, mixing, measuring | Knives, cutting boards, mixing bowls, measuring cups/spoons, graters, peelers |
| Cooking Zone | Applying heat | Spatulas, tongs, whisks, ladles, pots, pans, baking sheets, trivets, spices, oils |
| Cleaning Zone | Washing and disposal | Dish towels, sponges, scrub brushes, dishwasher pods, trash bags |
| Storage Zone | Storing food and leftovers | Food storage containers, plastic wrap, aluminum foil, reusable bags |
| Consumables | Plating and eating | Everyday cutlery (forks, spoons, knives), plates, bowls |
The DIY Movement Path Method: Your Blueprint for a Faster Kitchen
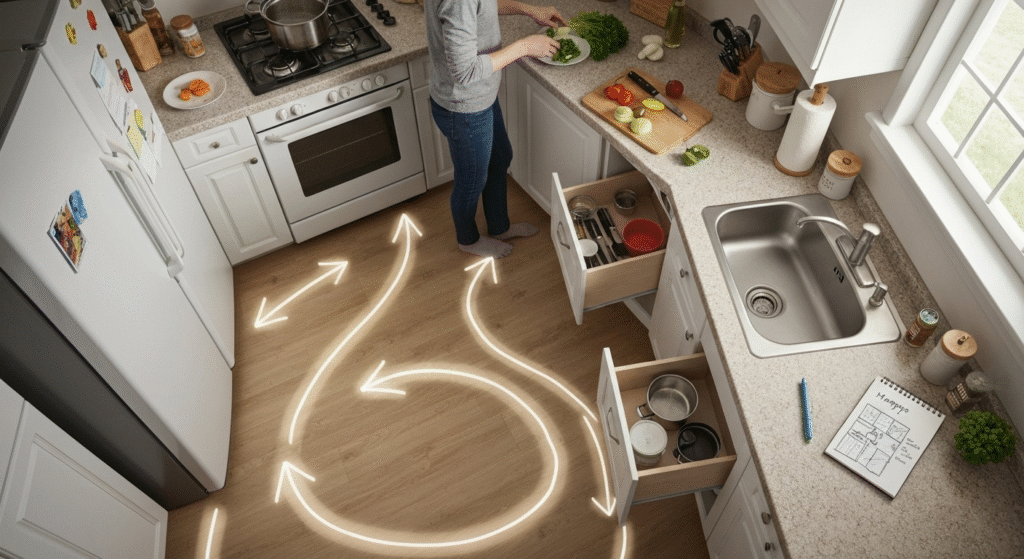
This is where you become a detective in your own kitchen. The “Movement Path Method” is a simple but incredibly effective way to identify the biggest bottlenecks in your current layout. Instead of guessing what should go where, you will use your own cooking habits as a guide.
Step 1: Gather Your “Mapping” Tools
You don’t need anything fancy. Just grab a notepad and a pen. If you want to get more visual, a few different colors of sticky notes can be helpful. The goal is to create a tangible record of your movements.
Step 2: Track Your Actions for a Common Recipe
Choose a meal you cook often, like spaghetti with meat sauce, a stir-fry, or even just your morning breakfast routine. Prepare the meal just as you normally would. The only difference is that you will pause to write down every single time you open a drawer or cabinet to retrieve something.
Your notes might look something like this:
- Opened drawer left of sink for a cutting board.
- Opened drawer right of stove for a large pan.
- Walked to pantry, opened drawer for an onion.
- Back to prep area, opened knife drawer.
- Walked across the kitchen to the “junk drawer” to find the can opener.
- Opened drawer by the stove again for a wooden spoon.
Be honest and thorough. Note every trip, every search, and every moment of frustration.
Step 3: Analyze Your Path and Identify Inefficiencies
Once you’re done cooking, sit down with your notes and look for patterns. This is where the inefficiencies will become glaringly obvious. Ask yourself these questions:
- What items did I have to walk the farthest to get? The can opener in the example above is a prime candidate for relocation.
- Which drawers did I open multiple times? These drawers contain high-frequency items and should be in the most convenient location.
- What tools did I use together but store separately? If you grabbed a pan, then walked elsewhere for cooking oil and a spatula, those items should be stored together in the Cooking Zone.
- Where did I struggle or get frustrated? Was it rummaging through a messy utensil drawer? That drawer needs an organizer and a purge.
This simple analysis is your personalized roadmap. It tells you exactly what needs to move and where it should ideally go based on your real-world habits.
The Rules of Ergonomic Drawer Placement
With your movement map complete, you can start reorganizing your drawers based on proven ergonomic principles. These rules are designed to make your kitchen more intuitive and comfortable to use.
Rule #1: Organize by Frequency of Use
This is the kitchen equivalent of the 80/20 rule, which states that we typically use 20% of our tools 80% of the time. Your most frequently used items deserve the most accessible storage locations, which I call “prime real estate.”
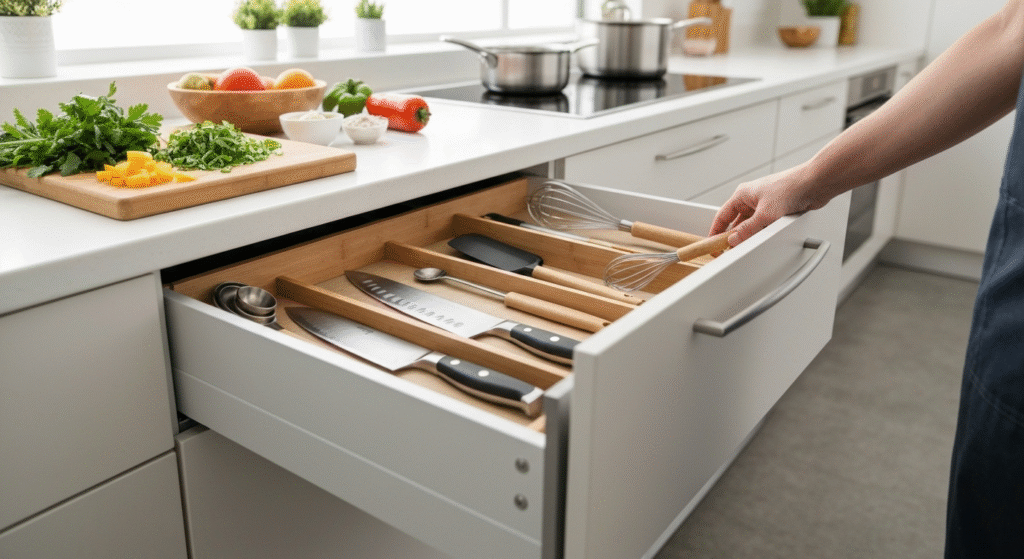
- Prime Real Estate (Top Drawers): The top drawers in your main work zones are the easiest to access. They should be reserved for your daily workhorses.
- Examples: Everyday cutlery, chef’s knife, paring knife, spatulas, tongs, measuring spoons.
- Secondary Storage (Middle Drawers): These are still easily accessible but require a little more effort. They are perfect for items you use a few times a week.
- Examples: Specialty utensils (e.g., potato masher, ice cream scoop), extra mixing bowls, colanders.
- Long-Term Storage (Bottom Drawers): The lowest drawers require the most bending and should be used for heavy, bulky, or rarely used items.
- Examples: Small appliances (hand mixer, immersion blender), specialty bakeware, holiday-themed items.
Rule #2: Consider Ergonomic Height and Reach
Your body has a “power zone”—the area between your shoulders and your knees. Working within this zone requires the least amount of physical strain. Storing items outside this zone, either too high or too low, forces you to stretch or bend, which can be tiring and inefficient over time.
This table provides a clear guide for what to store at each level for optimal ergonomics.
| Drawer Level | Ergonomic Zone | Best For… | Example Items |
| Top Drawer | Easiest Reach (Waist to Chest) | Daily, lightweight, small items | Cutlery, cooking utensils, spices, knives |
| Middle Drawers | Power Zone (Knees to Shoulders) | Frequently used, medium-weight items | Pots, pans, mixing bowls, plates, food processor |
| Bottom Drawer | Requires Bending (Below Knees) | Heavy, bulky, or rarely used items | Dutch oven, stand mixer attachments, bulk foods |
Rule #3: Group by Task, Not by Type
This is a game-changing shift in thinking for many people. We are often taught to organize by item type: all wooden spoons in one spot, all metal utensils in another. A much more efficient method is to group items that are used together for a specific task.
- The Baking Station: Instead of having measuring cups in one drawer, flour in the pantry, and a whisk across the room, create a dedicated baking drawer. Store your measuring tools, spatulas, mixing attachments, and other baking supplies together near the area where you typically prepare doughs and batters.
- The Coffee & Tea Nook: Designate a drawer near your coffee maker or kettle. Fill it with coffee filters, tea bags, a sugar bowl, spoons, and your favorite mugs. This makes your morning routine smooth and self-contained.
- The Lunch-Packing Drawer: This was a lifesaver for a family I worked with. We cleared a drawer and filled it with sandwich bags, reusable containers, kid-friendly cutlery, and napkins. It completely streamlined their chaotic morning school-prep routine.
Avoiding the Enemy of Speed: Drawer Clutter
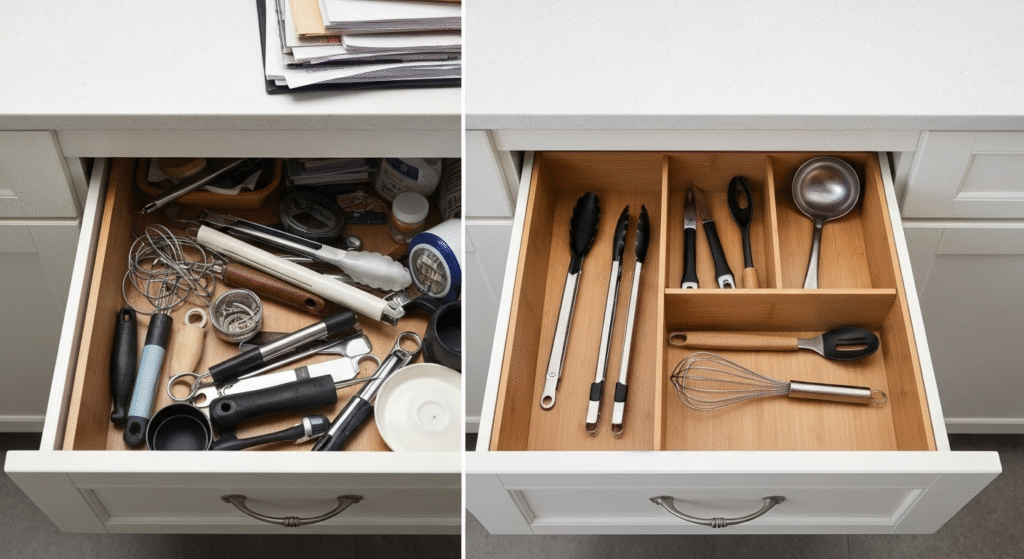
An ergonomic layout will fail if your drawers are too cluttered to find anything. The final step is to implement a system for keeping them organized and tidy for the long haul.
The Power of Drawer Organizers
Drawer organizers are essential for preventing items from sliding around and creating a jumbled mess. They create defined homes for everything, so you can grab what you need without searching.
| Organizer Type | Best For | Pros | Cons |
| Adjustable Bamboo Dividers | Utensils, gadgets, odd-shaped items | Customizable fit, warm aesthetic, sustainable | Can slide if not fitted tightly, may not work for tiny items |
| Deep Drawer Peg System | Plates, bowls, pots, lids | Prevents stacks from shifting, highly customizable | Takes up some drawer space, pegs can be misplaced |
| Spice Rack Drawer Insert | Spices and small jars | Keeps labels visible, utilizes full drawer width | Only fits standard-sized spice jars, less flexible for other items |
Adopt the “One In, One Out” Rule
To prevent clutter from creeping back in, adopt a simple rule: every time you bring a new kitchen tool into your home, an old one must go out. Did you buy a new, higher-quality spatula? Donate or discard the old, melted one immediately. This simple habit maintains equilibrium and stops your drawers from overflowing with duplicates.
Schedule an Annual Drawer Audit
Once a year, take 30 minutes to go through your drawers. It’s a quick maintenance task to keep your system working perfectly. Ask yourself:
- Is there anything in here I haven’t used in the last year?
- Do I have duplicates I don’t need? (You probably don’t need five different vegetable peelers).
- Is anything broken or worn out?
Be ruthless. Your drawer space is valuable. Only let the most useful and beloved tools earn their spot.
Frequently Asked Questions (FAQ)
What’s the best way to organize deep kitchen drawers?
Deep drawers are perfect for storing pots, pans, and small appliances. Use deep dividers or a pegboard system to keep items upright and separated. Storing pot lids vertically in a file-like organizer is also a great space-saver.
Should pots and pans go in drawers or cabinets?
Drawers are ergonomically superior for pots and pans. A deep drawer allows you to see everything from above and lift items out without having to crouch down and reach into the back of a dark cabinet.
Where is the best place to store kitchen knives?
For safety and to protect the blades, knives should never be loose in a drawer. The best options are an in-drawer knife block or a magnetic strip mounted on a wall in your prep zone. Both keep knives secure and easily accessible.
How high should my main prep counter be for good ergonomics?
The standard kitchen counter height is 36 inches, which works for most people. For optimal ergonomics, your work surface should be about 3-4 inches below your bent elbow. If you are particularly tall or short, you might consider custom heights in a renovation.
Conclusion
Creating an ergonomic kitchen is not about achieving perfection; it’s about making intentional choices that support the way you live and cook. By taking the time to map your movements, organize by zones and frequency, and eliminate clutter, you are investing in a calmer, more efficient future. A well-designed drawer layout gives back time and energy with every meal you prepare. It transforms your kitchen from a collection of cupboards and appliances into a truly intuitive workspace, freeing you up to focus on the joy of cooking.

Hi, I’m Edom Clark, the creator and writer behind Taanzo. For the past five years, I’ve been exploring and writing about kitchen storage and home organization. My experience comes from both personal experimentation and hands-on observation — testing different storage systems, materials, and layouts to find what truly works in everyday homes. Over time, I’ve come to appreciate how small adjustments in storage can transform the way we cook, clean, and even enjoy time in the kitchen. Through Taanzo, I aim to share that knowledge in a way that’s honest, approachable, and genuinely useful.

