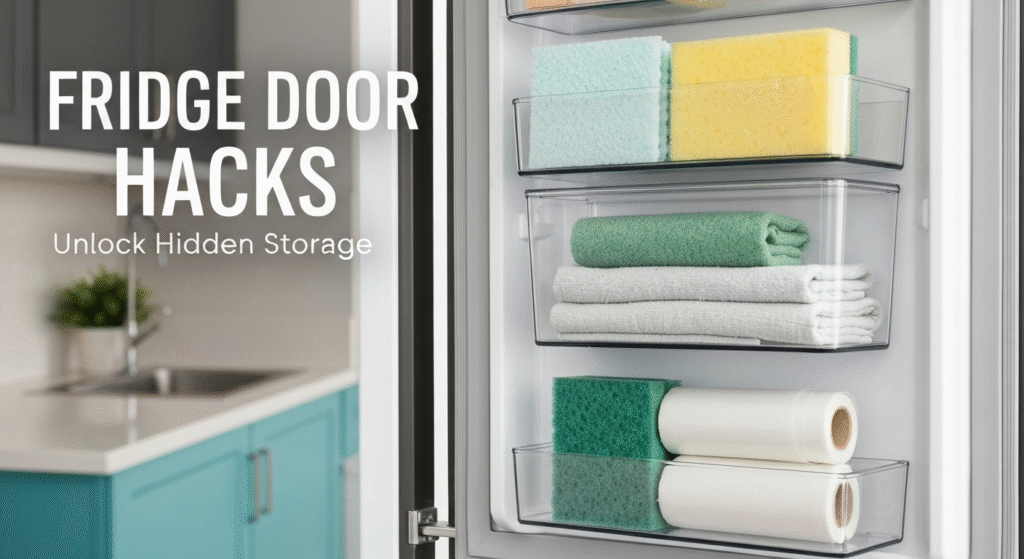
Finding enough storage in the kitchen can feel like a constant battle. We use clever drawer dividers and stackable pantry bins, but one of the most accessible storage areas is often overlooked: the refrigerator door. We typically fill it with condiments, drinks, and butter, but what if I told you it holds untapped potential for storing non-food items? Using refrigerator door pockets for non-food items is a game-changing organization hack, especially for small kitchens, that frees up valuable drawer and counter space. It’s about looking at a familiar appliance with fresh eyes.

My name is Edom Clark, and for years, I’ve been fascinated with finding smart, unconventional ways to organize kitchen spaces. My work isn’t just about making things look tidy; it’s about making them work better for the people who use them every day. I’ve spent countless hours helping people reclaim their kitchens from clutter, and that journey has always involved exploring new ideas. This passion for practical, clever solutions led me to investigate how every inch of the kitchen, including the fridge door, can be maximized. What I’ve learned is that with the right approach, you can create efficient, hidden storage where you least expect it.
Why Your Fridge Door is Prime Storage Real Estate
Let’s break down why this seemingly strange idea actually makes a lot of sense. The core problem in most kitchens isn’t a lack of space overall, but a lack of accessible space. We need items close at hand while we cook and clean, and the refrigerator is the central hub of kitchen activity.
The door pockets are designed for quick grab-and-go access. By repurposing some of this space, you can move non-perishable utility items from a cluttered “junk drawer” to a more organized, easy-to-reach spot. This is especially true for items you use frequently in the kitchen but aren’t food, like sponges, cleaning cloths, or aluminum foil. Freeing up even one drawer can make a huge difference in your kitchen’s workflow.
A few years back, I was working with a client in a studio apartment. Her kitchen was tiny, and every single drawer was overflowing. She kept her spare sponges, garbage bags, and foil on the counter, which just added to the visual clutter. We looked at her half-empty fridge door and had a lightbulb moment. By adding a few small, sealed containers, we moved all those utility items into the door. It instantly cleared her counter and freed up a drawer for cooking utensils. It’s a simple shift, but the impact on her daily routine was huge.
The Golden Rule: What You Can and Cannot Store in a Fridge Door
This is the most important part of the process. Not everything is suitable for fridge door storage. The environment inside a refrigerator is cool and can be humid, so you must be selective. The primary goal is to avoid damaging your items, your fridge, or creating any safety hazards.
Safe Items for Fridge Door Storage (with Proper Containment)
- New Sponges and Scouring Pads: Keep them in a sealed, waterproof bag or container to prevent them from absorbing moisture and odors before you even use them.
- Microfiber Cloths: A clean, dry cloth for wiping spills or polishing stainless steel can be kept in a zip-top bag, ready for action.
- Rolls of Plastic Wrap, Foil, or Parchment Paper: These are often housed in flimsy cardboard boxes that get crushed in drawers. Small, travel-sized rolls fit perfectly, but make sure the box is protected from condensation. Better yet, use a waterproof dispenser.
- Garbage Bags: A folded stack of fresh garbage bags can be tucked into a large, sealed plastic bag, keeping them neat and accessible.
- Twist Ties and Bag Clips: Small, essential items that get lost in drawers are perfect for a small, lidded plastic container on a door shelf.
- Waterproof-Cased Items: Anything already in a fully sealed, waterproof container is a potential candidate.
Items to Absolutely Avoid Storing in the Fridge Door
- Electronics: Batteries, phones, or any electronic gadget. The cold and condensation can cause permanent damage to circuits and reduce battery life.
- Paper Goods: Paper towels, napkins, or important papers will absorb moisture from condensation and become a soggy mess.
- Medications: Unless the medication specifically requires refrigeration, the cool, humid environment is not ideal and can degrade its effectiveness.
- Photographs: Moisture will ruin them over time.
- Anything with a Strong Odor: Items like scented candles or air fresheners can transfer their smells to your food, even if they seem sealed.
The key is to always think “moisture first.” If an item can be damaged by dampness, it does not belong in the refrigerator.
Choosing the Right Containers: Your Defense Against Moisture
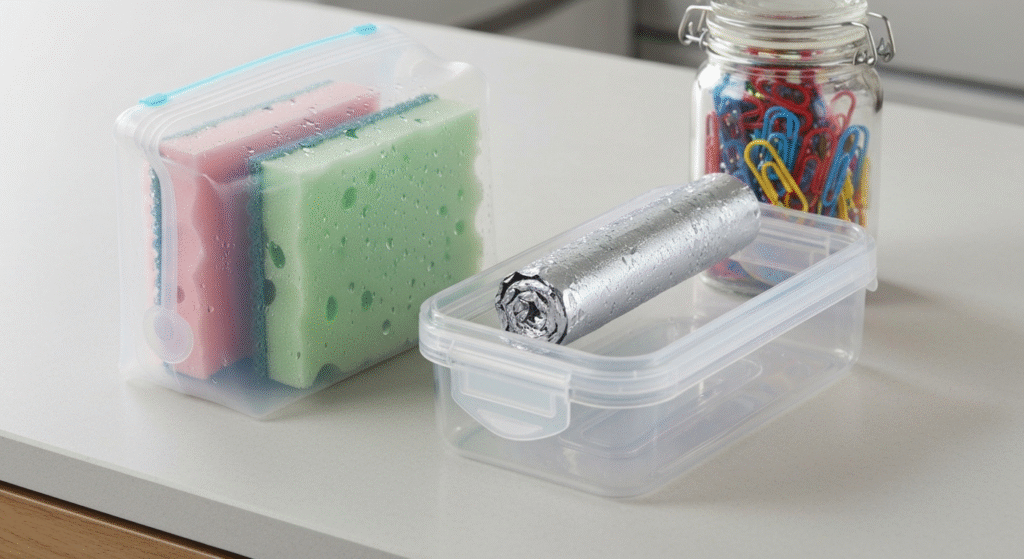
Simply tossing a roll of foil into the door pocket isn’t enough. Condensation is inevitable in a fridge, and your secret weapon is the right container. The goal is to create an airtight, waterproof barrier between your non-food items and the refrigerated environment.
I’ve tested many options over the years, and a few types of containers consistently perform the best for this specific task. Let’s compare them.
| Container Type | Moisture Resistance | Durability | Best For | Average Cost |
| Silicone Food Pouches (e.g., Stasher bags) | Excellent | High | Sponges, cloths, bag clips, twist ties | $$ |
| Hard-Shell Plastic Bins (with Gasket Seals) | Excellent | High | Rolls of foil/wrap, stacks of garbage bags | $$ |
| Heavy-Duty Zip-Top Freezer Bags | Good | Medium | Folded cloths, garbage bags (short-term) | $ |
| Small Glass Jars (with Clamp Lids) | Excellent | Medium (can break) | Small items like clips, ties, rubber bands | $ |
My Professional Experience:
While heavy-duty freezer bags are a decent budget option, I strongly recommend investing in either silicone pouches or small, hard-shell plastic bins with a gasket seal (the kind used for pantry food storage). A client once tried using a standard zip-top sandwich bag for a stack of coupons. Within a week, condensation had seeped in through the weak seal, and the ink had run, making them all unusable. We switched to a small, airtight plastic container, and she never had a problem again. That small investment in a better container saved her a lot of frustration.
Step-by-Step Guide to Setting Up Your Non-Food Door Station
Ready to reclaim your fridge door? Following these steps will ensure your setup is organized, safe, and effective from day one.
Step 1: Empty and Clean the Door
Start with a clean slate. Take everything out of the door pockets you plan to use. Wipe them down thoroughly with a food-safe cleaner and make sure they are completely dry. This prevents any old spills or crumbs from getting trapped with your newly organized items.
Step 2: Declutter and Select Your Items
Go through your kitchen drawers and identify the non-food items that are causing the most clutter. Gather your new sponges, rolls of foil, bag clips, and anything else from the “safe” list. This is also a great opportunity to throw away any old, unnecessary items.
Step 3: Choose and Prepare Your Containers
Based on the items you’ve selected, pick the appropriate waterproof containers. Make sure they are clean and dry before use. If you’re using bags, squeeze as much air out as possible before sealing to reduce interior condensation.
Step 4: Pack and Label Everything
Place your items neatly into their designated containers. I highly recommend labeling each container, even if it’s clear. A simple label made with a permanent marker on masking tape works wonders. This reminds you (and other family members) that the contents are not food and helps you find what you need without opening every box.
Step 5: Arrange for Practicality
Place the containers in the door pockets. Put the items you use most often in the easiest-to-reach spots. For example, if you constantly need bag clips, put them in a middle shelf. The spare garbage bags you only need once a day can go on a lower or higher shelf. Make sure the containers fit snugly and won’t fall out when you open the door.
Step 6: Do a Weekly Check-Up
For the first few weeks, make a point to quickly check your containers for any signs of moisture inside. This helps you confirm that your seals are working correctly. If you see any condensation, either your container isn’t fully airtight or the items were slightly damp when you put them away.
Creative Storage Ideas for Your Refrigerator Door
Once you have the basics down, you can get creative with how you use the space. Think of it as creating specialized “kits” for different kitchen tasks.
The Cleaning Caddy
Designate one door bin as your quick-cleanup station.
- Contents: Two new sponges (one for dishes, one for counters), a tightly folded microfiber cloth, and a small plastic scraper for cooked-on food.
- Container: A small, rectangular plastic bin with a clip-on lid keeps everything together and dry.
- Benefit: When you have a spill or need to wipe down the counters, everything you need is in one place instead of scattered under the sink.
The Food Prep Zone
Keep your food wrapping essentials protected and easy to grab.
- Contents: A small roll of aluminum foil, a roll of plastic wrap, and a roll of parchment paper.
- Container: Look for slim, waterproof dispensers designed for these rolls, or place the original boxes inside a large, sealed bag.
- Benefit: Prevents the cardboard boxes from getting crushed or damp, making it much easier to pull out a clean sheet when you’re in the middle of cooking.
The Utility Kit
This is your replacement for the classic junk drawer, but far more organized.
- Contents: Bag clips, rubber bands, twist ties, and spare batteries (AAA or AA) for small kitchen gadgets like a meat thermometer.
- Container: A small, sectioned craft organizer box with a secure lid is perfect. It keeps small items separated and easy to see.
- Benefit: You’ll never have to rummage through a messy drawer for a tiny bag clip again.
Frequently Asked Questions (FAQs)
1. Is it truly safe to store non-food items in the refrigerator?
Yes, it is perfectly safe as long as you follow two key rules: only store items that won’t be damaged by cool temperatures and moisture, and always place them in completely sealed, waterproof containers to prevent any cross-contamination with your food.
2. Will adding these items to my fridge door make it less energy-efficient?
No, it shouldn’t have any noticeable impact. A full refrigerator actually runs more efficiently than an empty one because the items inside help maintain the cold temperature. As long as you aren’t blocking air vents and the door can close properly, you are fine.
3. What’s the best all-around container for moisture protection?
For versatility and excellent protection, I recommend silicone pouches with a pinch-lock seal or hard-shell food storage containers that have a rubber or silicone gasket in the lid. Both create a highly effective barrier against moisture.
4. Can I store my phone or a small Bluetooth speaker in the door to listen to music while I cook?
Absolutely not. Electronics are highly susceptible to damage from both the cold temperature and condensation inside a fridge. This can lead to short circuits, dead batteries, and permanent damage. Keep all electronics out of the refrigerator.
Conclusion:
Thinking outside the box—or in this case, inside the fridge—is the key to unlocking a truly organized and functional kitchen. Repurposing your refrigerator door for non-food storage isn’t just a quirky trick; it’s a practical strategy for maximizing space, reducing clutter, and improving your daily workflow. By carefully choosing what to store and using the right waterproof containers, you can create a designated home for those essential utility items that so often get lost in the shuffle. So take a look at your refrigerator door today and see the untapped potential waiting for you.

Hi, I’m Edom Clark, the creator and writer behind Taanzo. For the past five years, I’ve been exploring and writing about kitchen storage and home organization. My experience comes from both personal experimentation and hands-on observation — testing different storage systems, materials, and layouts to find what truly works in everyday homes. Over time, I’ve come to appreciate how small adjustments in storage can transform the way we cook, clean, and even enjoy time in the kitchen. Through Taanzo, I aim to share that knowledge in a way that’s honest, approachable, and genuinely useful.

