
Hidden drawers beneath toe-kicks are one of the most clever ways to reclaim lost space in your kitchen. If you feel like you’ve maximized every cabinet and countertop, it’s time to look down. That small, often-ignored baseboard area under your lower cabinets is a goldmine of storage potential. With a little planning and effort, you can transform this dead space into functional, seamless drawers perfect for items you need but don’t want to see. This guide will walk you through everything, from planning to installation, turning that overlooked gap into your kitchen’s smartest feature.
My name is Edom Clark, and for years, I’ve been obsessed with finding smart solutions for everyday kitchen challenges. My work has always been about more than just aesthetics; it’s about making a space truly work for the people who use it. I’ve spent countless hours helping homeowners and remodelers rethink their layouts, and the toe-kick drawer is a solution I come back to again and again. It’s a project that delivers a huge functional payoff. I’m here to share what I’ve learned—the practical steps, the potential pitfalls, and the little details that make a big difference.
What Exactly Are Toe-Kick Drawers? The Untapped Space

Before we dive into the how-to, let’s clarify what we’re talking about. The “toe-kick” is the recessed space at the bottom of your base cabinets. It’s designed to let you stand closer to the countertop without stubbing your toes. This space is typically about 4 inches high and 3 inches deep. While it seems small, it runs the entire length of your cabinetry. This adds up to a significant amount of unused real estate.
Toe-kick drawers are custom-built, shallow drawers designed to fit perfectly into this void. They are mounted on special hardware and feature a front panel that matches your existing toe-kick board. When closed, they are virtually invisible. This maintains the clean lines of your kitchen while secretly adding a surprising amount of storage for flat or small items. It’s a classic example of form meeting function in a way that feels both custom and incredibly practical.
The Real Benefits of Toe-Kick Storage
Installing hidden drawers beneath your toe-kicks isn’t just a novelty; it offers practical advantages that can genuinely improve your kitchen’s functionality and flow. Let’s break down why this project is worth considering.
Maximize Every Last Inch
In small kitchens, condos, or apartments, every square inch is precious. Toe-kick drawers allow you to tap into space that is otherwise completely wasted. Think about it: if you have 15 feet of base cabinets, you have 15 feet of potential hidden storage. This can be the difference between a cluttered countertop and a clear, organized workspace.
A Sleek, Clutter-Free Look
The best thing about toe-kick drawers is that they are completely hidden. They don’t add any visual bulk to your kitchen. Instead, they help you reduce clutter by providing a home for items that might otherwise live on the counter or be stuffed into other drawers. This creates a more streamlined and minimalist aesthetic without sacrificing storage.
A Perfect Spot for Specific Items
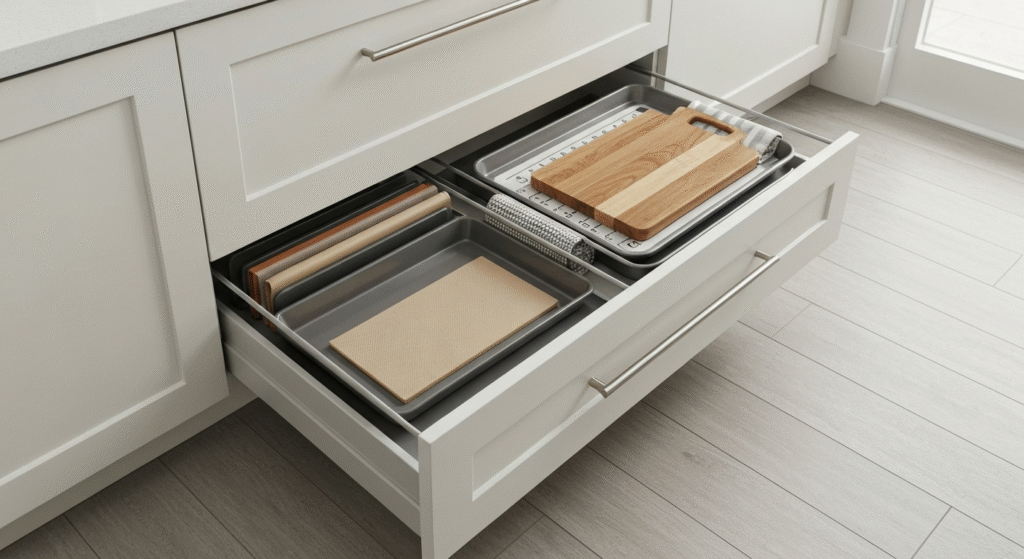
These drawers are uniquely suited for certain items. Their shallow depth makes them ideal for things that are flat or don’t stack well in deeper drawers.
- Baking sheets and cookie pans
- Cutting boards
- Serving platters and trays
- Shallow roasting pans
- Folded kitchen towels or linens
- Pet food and water bowls (on a slide-out tray)
- Emergency supplies like a small fire extinguisher or first-aid kit
Here’s a quick look at the pros and cons to help you decide if this project is right for your space.
| Pros | Cons |
| Maximizes Unused Space: Taps into valuable real estate that is typically wasted. | Limited Height: Only suitable for flat or shallow items. |
| Completely Hidden: Maintains a clean, seamless look in your kitchen. | Requires Custom Work: This is not an off-the-shelf solution; it requires careful measurement and building. |
| Reduces Countertop Clutter: Provides a dedicated home for items that often take up surface space. | Can Be Tricky to Install: Requires some DIY skill, especially when dealing with uneven floors. |
| Adds a High-End, Custom Feel: This feature adds a touch of clever design and thoughtfulness to your kitchen. | Potential for Debris: Being close to the floor, they may collect more dust or crumbs if not sealed properly. |
Planning Your Toe-Kick Drawer Project
Proper planning is the key to a successful installation. Before you cut a single piece of wood, you need to assess your space, choose the right materials, and select the best hardware for the job.
Step 1: Measure and Assess Your Cabinets
This first step is crucial. Not all cabinets are suitable for toe-kick drawers. You need to check for obstructions.
- Remove the Toe-Kick Board: Carefully pry off the existing toe-kick board under one of your cabinets. Use a putty knife and a small pry bar to avoid damaging the board or the cabinet.
- Inspect the Space: Use a flashlight to look inside. You’re checking for plumbing pipes, electrical wiring, HVAC vents, or even the cabinet legs themselves. Many modern cabinets, especially frameless ones, have adjustable legs right where you’d want to put a drawer. If you find obstructions, you can’t install a drawer in that specific cabinet section.
- Measure Everything: If the space is clear, measure the height, depth, and width of the opening. Remember to measure between any cabinet supports or legs. Do this for every cabinet section where you plan to install a drawer.
- A Personal Experience: I once had a client with a beautiful galley kitchen who was desperate for more storage. We planned for three large toe-kick drawers. When we removed the toe-kick board, we found a water line for the dishwasher running right through the middle of the longest section. Instead of scrapping the plan, we adapted. We built two smaller drawers on either side of the pipe. It required a bit more work, but the client was thrilled to still gain that valuable storage. Always be prepared to adapt.
Step 2: Choose the Right Materials
The materials you choose will determine the durability and longevity of your drawers.
- Drawer Box: Use 1/2-inch or 3/4-inch plywood. Baltic birch is an excellent choice as it’s strong, stable, and holds screws well. Avoid MDF or particleboard, as they can sag over time and don’t hold up well to the occasional scuff or knock.
- Drawer Bottom: For most items, a 1/4-inch plywood bottom is sufficient. However, if you plan to store heavier items like a cast iron pizza stone or a stack of platters, upgrade to a 1/2-inch plywood bottom. This prevents the drawer from bowing under the weight.
- Drawer Front: The new drawer front will be the original toe-kick board (if you can salvage it) or a new piece of wood that you can paint or stain to match your cabinets perfectly.
Step 3: Select the Perfect Drawer Slides
The drawer slides are the most important component. They do all the work. Given the location, you need slides that are durable and easy to operate. Your two main options for a seamless, handleless look are push-to-open and touch-latch systems.
| Feature | Push-to-Open Slides | Touch-Latch System (with standard slides) |
| Mechanism | The slide has a built-in spring mechanism. You push on the drawer front, and it pops open an inch or two. | A separate magnetic or mechanical latch is installed at the back of the cabinet. You use standard slides. |
| Installation | Simpler installation as it’s an all-in-one unit. Requires precise placement. | Two-part installation (slides and latch). Can be more forgiving on alignment. |
| Cost | Generally more expensive. | More budget-friendly. |
| Feel | A smooth, modern, and integrated feel. | A distinct “click” when opening and closing. Can sometimes feel less robust. |
| Best For | Kitchens where a premium feel is desired and for DIYers who prefer a simpler, one-part installation. | Budget-conscious projects or situations where the cabinet interior offers more room for a separate latch. |
For most toe-kick applications, I recommend full-extension, push-to-open slides. “Full-extension” means the drawer will pull all the way out, giving you easy access to everything inside. The push-to-open feature is perfect for this location, as you can simply nudge the drawer with your foot to open it.
The Installation Guide: A Step-by-Step Breakdown
Once your planning is complete, it’s time to build and install your drawers. Take your time, measure twice, and work methodically.
Tools and Materials List
- Tape measure and pencil
- Drill with bits
- Circular saw or table saw
- Pry bar and putty knife
- Level
- Clamps
- Wood glue
- Screws
- Sandpaper
- Your chosen plywood and drawer slides
Step 1: Remove the Existing Toe-Kick
As you did in the assessment phase, carefully remove the toe-kick boards from the sections where you’ll be installing drawers. Try to do this without breaking them, as you might be able to reuse them for your drawer fronts.
Step 2: Build the Drawer Boxes
Using your measurements, build the drawer boxes. Remember to account for the thickness of the slides and the drawer front.
- Cut the Pieces: Cut the four sides and the bottom for each drawer from your plywood. The height of your drawer box should be at least 1/2-inch less than the height of the toe-kick opening to ensure it doesn’t scrape.
- Assemble the Box: Apply wood glue to the joints and then secure them with screws. A simple butt joint is strong enough for this application. Ensure the box is perfectly square before the glue dries.
- Attach the Bottom: Apply a bead of glue along the bottom edge of the four walls and place the bottom panel on top. Secure it with screws or brad nails every few inches.
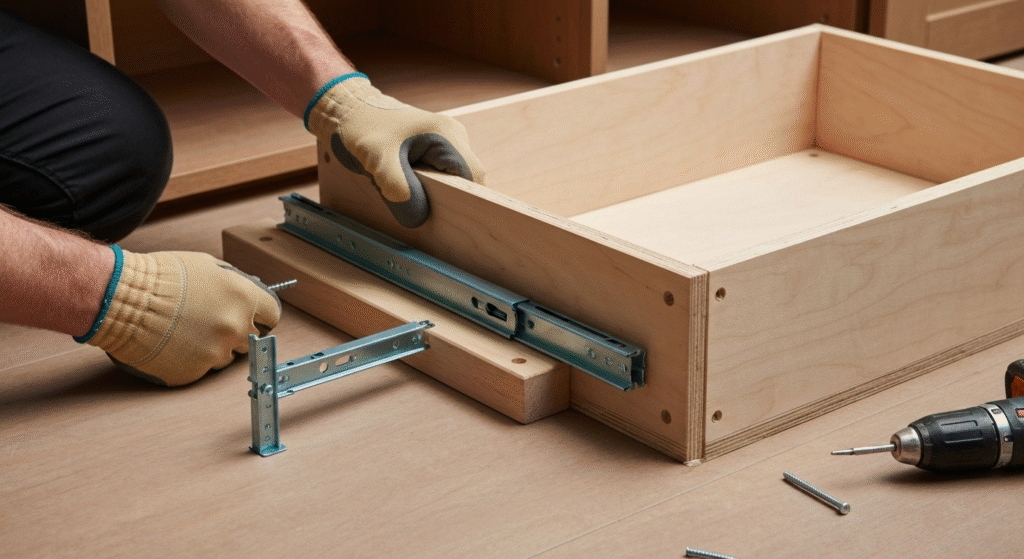
Step 3: Install the Drawer Slides
This is the most technical part of the process. Follow the instructions that came with your slides carefully.
- Separate the Slides: Drawer slides come in two parts: the cabinet member (which attaches to the cabinet) and the drawer member (which attaches to the drawer). Separate them.
- Mount the Cabinet Members: Since there’s no cabinet wall to mount to, you’ll need to attach wood blocking or cleats to the “floor” of the cabinet space. These cleats will provide a mounting surface for the slides. Make sure they are perfectly level and parallel to each other.
- Mount the Drawer Members: Attach the other half of the slides to the bottom sides of your drawer box. Ensure they are level and parallel with the bottom of the drawer.
- Insert the Drawer: Carefully slide the drawer into the cabinet members. It should click into place. Test the movement. It should be smooth and even.
Step 4: Create and Attach the Drawer Front
The final step is to create a seamless front that hides the drawer.
- Prepare the Front: Cut your drawer front panel to the exact size of the opening, leaving a very slight gap (about 1/16-inch) on all sides to allow for movement. Finish it (paint or stain) to match your cabinets before you attach it.
- Position the Front: Close the drawer. Use double-sided tape to temporarily stick the drawer front onto the drawer box. This allows you to position it perfectly so the gaps are even all around.
- Secure the Front: Once you are happy with the position, carefully open the drawer without moving the front. From inside the drawer box, drive several screws through the box and into the back of the drawer front to secure it permanently.
Frequently Asked Questions (FAQs)
1. How much weight can a toe-kick drawer hold?
This depends entirely on the drawer slides and the construction of the drawer box. Standard light-duty slides might hold around 30-50 pounds. If you reinforce the drawer bottom and use heavy-duty slides, you could potentially store more. Always check the weight rating on your chosen hardware.
2. Can I install toe-kick drawers in an existing kitchen?
Absolutely. This is a very popular retrofit project. The main challenge is carefully removing the existing toe-kick without damaging your cabinets and then checking for any obstructions behind it.
3. Do toe-kick drawers get dirty easily?
Because they are close to the floor, they are more exposed to dust, crumbs, and pet hair. However, a well-fitted drawer front with minimal gaps will keep most debris out. You will likely need to wipe them out a little more often than your upper drawers.
4. Is this a difficult DIY project?
It’s an intermediate-level project. If you are comfortable with basic woodworking skills like measuring accurately, cutting straight lines, and assembling a box, you can likely handle it. The trickiest part is getting the drawer slides perfectly level and aligned in a tight space.
Conclusion: A Small Project with a Big Impact
Hidden drawers beneath your toe-kicks are more than just a clever storage hack; they are a sign of a well-designed, thoughtful kitchen. By transforming an overlooked and underutilized space, you add a layer of functionality that makes your daily life easier and your kitchen feel more organized. It’s a project that requires careful planning and a bit of patience, but the reward is a seamless, custom feature that will have you wondering how you ever lived without it. So next time you’re in your kitchen, look down—you might just find your next weekend project and the perfect new home for your baking sheets.

Hi, I’m Edom Clark, the creator and writer behind Taanzo. For the past five years, I’ve been exploring and writing about kitchen storage and home organization. My experience comes from both personal experimentation and hands-on observation — testing different storage systems, materials, and layouts to find what truly works in everyday homes. Over time, I’ve come to appreciate how small adjustments in storage can transform the way we cook, clean, and even enjoy time in the kitchen. Through Taanzo, I aim to share that knowledge in a way that’s honest, approachable, and genuinely useful.

