
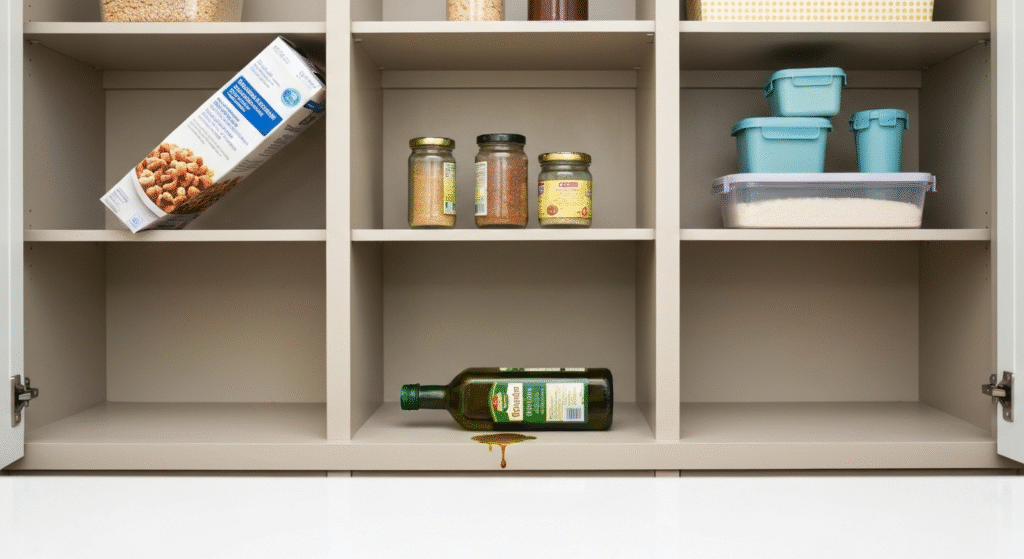
Is your pantry a daily game of Tetris? You’re not alone. You try to slide a tall box of cereal onto a shelf, but it snags on the top. A new bottle of olive oil is just a fraction too high, forcing you to lay it on its side, risking a leak. Soon, you have a chaotic pile of items crammed into spaces they were never meant for. This isn’t just messy; it’s inefficient and frustrating. The standard, evenly spaced shelves in most pantries simply don’t account for the reality of modern groceries, with their weird shapes and bulky packaging.
The good news is that you don’t have to live with a pantry that works against you. The secret to a truly organized and functional space isn’t about buying more containers; it’s about mastering smart shelf spacing. By customizing the vertical gaps between your shelves, you can create a designated home for every single item, from the tallest bottle to the widest snack bin. This guide will walk you through exactly how to measure, plan, and adjust your pantry for a perfect, custom fit.
For the past five years, my work has revolved around helping people reclaim their kitchen storage, transforming cluttered pantries into models of efficiency. I’ve learned that the most dramatic changes often come from the smallest adjustments. Just last month, a client in a small apartment was at their wits’ end with their narrow pantry. They loved buying in bulk but couldn’t fit the large containers. Instead of suggesting expensive new hardware, we simply reconfigured their existing adjustable shelves. The key was creating specific height zones—one for tall bottles, one for cereal boxes, and another for stacked cans. The simple trick of measuring their tallest item in each category and adding just one inch of “grab space” above it unlocked dozens of square inches they didn’t know they had. It’s this kind of practical, hands-on experience that proves a well-spaced pantry is within anyone’s reach.
Why Standard Pantry Shelving Fails the Real-World Test
Most builders and cabinet makers install pantry shelves with a standard, uniform gap between each one. While this looks neat in an empty closet, it fails spectacularly once you start loading it with actual groceries. This “one-size-fits-none” approach is the root cause of most pantry clutter and inefficiency.
The biggest issue is wasted vertical space. You might have a shelf full of canned goods with six inches of empty air above them. That’s valuable real estate you could be using. Meanwhile, on the shelf above, your jumbo-sized cereal boxes are crammed in at an angle because the gap is two inches too short. This forces you into a disorganized system where item placement is dictated by random chance rather than logic and convenience.
This flawed design leads to several common problems:
- Item Tetris: You’re constantly shuffling and rearranging items to make things fit.
- Poor Visibility: When taller items block shorter ones, you forget what you have, leading to duplicate purchases and food waste.
- Accessibility Issues: Having to unstack three boxes just to get to the one you need at the back is a daily annoyance.
- Risk of Damage: Items laid on their side, like oil bottles, can leak. Precariously balanced boxes can fall and create a mess.
Ultimately, standard shelving forces you to adapt to the pantry’s limitations. Smart shelf spacing flips that script, making the pantry adapt to your needs.
The Foundation of a Flexible Pantry: Understanding Adjustable Shelving
Before you can customize your spacing, you need shelves that can move. If you have fixed shelves, your options are limited, but for most, the pantry is equipped with some form of adjustable system. Understanding the type you have is the first step toward unlocking its full potential.
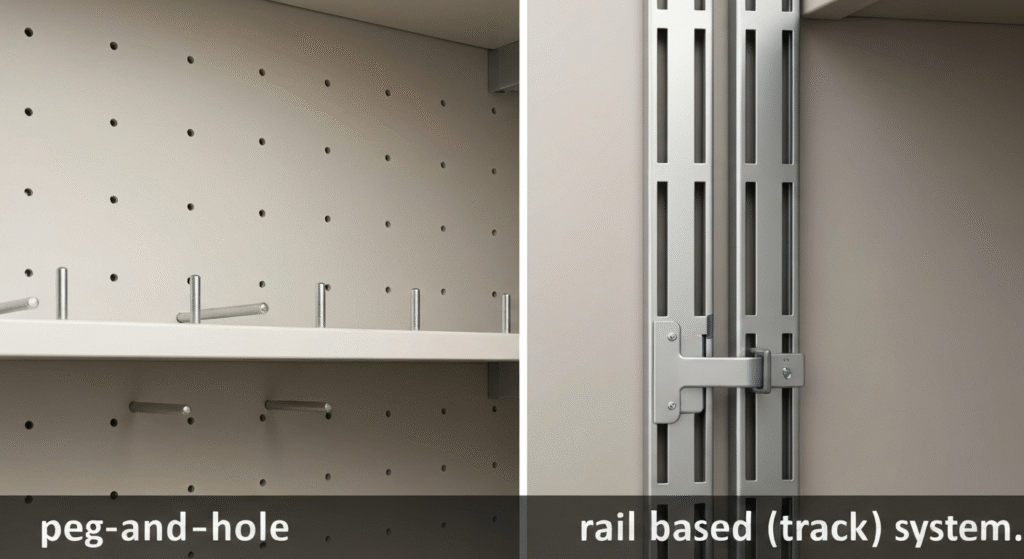
Peg-and-Hole Systems: The Common Standard
This is the most common type of adjustable shelving. The pantry walls are lined with a series of evenly drilled holes. Small metal or plastic pegs are inserted into these holes, and the shelf rests on top of them. While they are a huge step up from fixed shelves, they do have limitations.
| Pros | Cons |
| Simple and easy to understand. | Adjustment is limited to the pre-drilled hole spacing (usually 1-2 inches). |
| Widely available and standard in most homes. | A “nearly perfect” fit might not be possible, forcing you to choose a gap that is slightly too big or too small. |
| Generally sturdy for everyday items. | Pegs can sometimes fall out or get lost. |
Rail-Based (or Track) Systems: The Organizer’s Secret Weapon
Also known as track or standard and bracket systems, these are the gold standard for custom storage. Metal rails with continuous slots are mounted vertically to the wall. Brackets then lock into these slots at any height you desire, and the shelf sits on the brackets. This system offers virtually infinite adjustability.
The key advantage is precision. You are not bound by pre-drilled holes. If you need to raise a shelf by just half an inch to accommodate a new brand of crackers, you can do it in seconds. This level of control is what allows you to eliminate wasted space and create a truly custom-fit pantry. For anyone serious about organization, especially those in small homes where every inch counts, a rail-based system provides an unmatched level of flexibility.
The Measure and Plan Method: Your Blueprint for Perfect Spacing
Randomly moving shelves around won’t get you very far. To achieve a truly organized pantry, you need a clear plan based on what you actually store. This methodical approach ensures every item has a logical and accessible home.
Step 1: Conduct a Pantry Audit
First, take everything out of your pantry. Yes, everything. This is the perfect time to declutter, check expiration dates, and wipe down the shelves. Once it’s empty, group all of your items together on a table or the floor. Don’t group by food type yet; instead, group by container height and shape.
- Talls: Olive oil, vinegar bottles, tall cereal boxes, rolls of paper towels.
- Mediums: Standard cans, pasta boxes, jars of peanut butter.
- Shorts: Canned tuna, spice jars, small boxes of baking soda.
- Wides: Family-size snack bins, large bags of chips, cracker boxes.
- Bulky Bags: Flour, sugar, pet food that slump and spread out.
This visual inventory is critical. It shows you the different height zones you’ll need to create.
Step 2: The “Plus-One-Inch” Rule
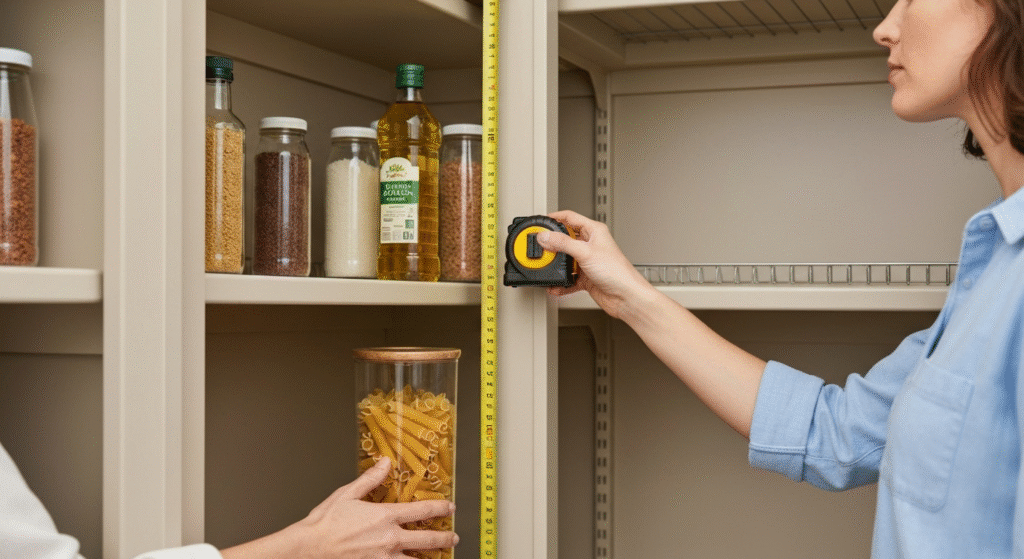
Now, measure the tallest item in each group. For your “Talls” group, this might be a 13-inch bottle of balsamic vinegar. For your “Mediums,” it might be a 7-inch box of spaghetti. The magic formula for shelf spacing is the height of your tallest item in a category, plus one inch.
Height of Tallest Item + 1 Inch = Optimal Shelf Gap
This one inch of clearance is the sweet spot. It provides just enough “grab space” to easily slide items in and out without your knuckles hitting the shelf above. It’s enough room for access but not so much that you’re wasting precious vertical space. Any more is a waste; any less makes access difficult.
Step 3: Mapping Your Zones on Paper
Before you start moving shelves, sketch a simple diagram of your pantry. A piece of graph paper works perfectly for this. Decide where each zone will live. A good rule of thumb is to place heavy and bulky items on the bottom shelves and lighter, less-frequently-used items on the top shelves.
- Bottom Zone: Dedicate this area to heavy items like 2-liter soda bottles, large bags of flour, or cases of canned goods.
- Prime Zone (Eye Level): This is your most valuable real estate. Place the items you use every day here—cereal, snacks, pasta, coffee.
- Top Zone: This is for lightweight items you don’t need often, like backup paper towels, special occasion ingredients, or seasonal items.
On your map, label each shelf with the category it will hold and the calculated shelf gap height. This blueprint removes all guesswork and ensures a smooth and efficient reorganization process.
Taming the Giants: Spacing for Tall and Awkward Items
Your blueprint will work for most standard items, but a few categories require special consideration. These are the tall, bulky, and wide items that cause the most organizational headaches.
Creating a “Beverage Tower” for Tall Bottles
Tall, thin items like bottles of oil, vinegar, wine, or soda are often the most difficult to store. They are too tall for standard shelves and can be tippy. The best solution is to create a dedicated vertical zone for them.
By adjusting one section of your shelving with a taller gap (e.g., 14-16 inches), you can line them all up neatly. This keeps them upright, prevents leaks, and allows you to see your entire inventory at a glance. If you only have a few tall bottles, consider placing them on the very top shelf where the height is often unrestricted, as long as they aren’t too heavy.
The Bulk Bin Dilemma
Large cereal boxes, bulk bags of rice, or giant containers from warehouse clubs present a unique challenge. They are both tall and wide. These items almost always belong on a bottom shelf or even on the floor of the pantry. The shelf directly above them should be spaced high enough to accommodate their full height, following the “Plus-One-Inch” rule. For soft bags like flour or sugar, consider placing them inside an open-top bin or container. This corrals them, prevents slumping, and makes them easier to slide out.
Handling Wide and Shallow Items
Snack bins, cracker boxes, and multipacks of ramen are often wider than they are tall. Stacking them is unstable, and placing them sideways makes it hard to see what you have. The solution is to give them a shelf with a shorter-than-average height. A shallow 5 or 6-inch gap may be all you need to slide these boxes in horizontally. This technique, often called “file-folder storage,” keeps everything visible and prevents you from having to unstack a wobbly tower to get the box at the bottom.
Essential Gear: Anti-Tip Stabilizers and Other Helpers
Perfectly spaced shelves are the main goal, but a few simple tools can enhance stability and maximize your space even further, especially for those top-heavy or wobbly items.
The Power of Anti-Tip Support
Once you start storing tall bottles or stacked cans, you introduce the risk of items tipping over. This is where stabilizers come in handy. They are simple devices that prevent this forward-tipping motion.
| Stabilizer Type | Best For | How It Works |
| Clear Shelf Dividers | Stacked cans, boxes, or cookbooks. | These acrylic or plastic dividers clip or slide onto the shelf, acting like bookends to keep stacks upright and contained. |
| Tension Rods | Tall, lightweight bottles or boxes on an open-backed shelf. | A small spring-loaded tension rod installed vertically between two shelves acts as a guardrail, preventing items from falling forward. |
| Museum Gel/Putty | Single, tippy items like a tall vase or a decorative oil bottle. | A small, removable dab of this sticky putty on the bottom of an item secures it to the shelf without causing damage. |
Using these simple tools provides an extra layer of security, ensuring that your perfectly organized items stay that way.
Putting It All Together: A Step-by-Step Guide to Reshuffling Your Shelves
With your plan in hand, you’re ready for the physical reorganization. Follow these steps for a smooth and logical process.
- Empty and Clean: Start with a completely empty and clean pantry. This is non-negotiable.
- Sort and Group: Confirm your item groupings from the audit step. Discard anything that’s expired.
- Set the Bottom Shelf: Using your paper map, determine the height for your first shelf—usually for your bulkiest items. Adjust the pegs or brackets and lock in the shelf. Use a level to ensure it’s straight.
- Load and Measure: Place the corresponding items on that shelf. Now, take the tallest item for the next shelf up, hold it on top of the items you just placed, and add one inch of clearance. This is where you will place your next shelf.
- Work Your Way Up: Continue this process, working from the bottom to the top. Load a shelf, measure for the next one, and install it. This bottom-up method is much more accurate than trying to measure and set all the shelves at once.
- Test and Secure: As you load each shelf, give the items a gentle nudge to check for stability. Add dividers or other stabilizers where needed.
Frequently Asked Questions
How much space should be left above items on a shelf?
The ideal amount is about one inch. This provides enough “grab space” to easily get items in and out without your hand hitting the shelf above, while not wasting significant vertical space.
What is the best way to store heavy items in a pantry?
Heavy items like bulk bags of flour, cases of cans, or large appliances should always be stored on the bottom shelves or the floor. This creates a low center of gravity, making the entire shelving unit more stable and reducing the risk of shelves sagging or collapsing.
Can I make my fixed, non-adjustable shelves more flexible?
Modifying fixed shelves is a significant DIY project that involves removing them and installing a track or peg-hole system. A simpler solution is to use shelf risers and under-shelf baskets to divide the vertical space on the fixed shelves you have, creating mini-levels for smaller items.
How often should I re-evaluate my pantry shelf spacing?
A good rule of thumb is to re-evaluate your pantry organization once a year. Your shopping habits can change, or you may find that a particular arrangement isn’t as practical as you thought. A quick annual reshuffle can keep your pantry functioning perfectly for your current needs.
A Pantry That Finally Fits Your Life
Transforming your pantry from a zone of chaos into a model of order is not about having more space—it’s about using your space more intelligently. By moving beyond the limitations of standard, one-size-fits-all shelving, you can create a custom storage solution that perfectly matches the items you buy and use every day. With a clear plan, a tape measure, and a little bit of time, you can implement smart shelf spacing that eliminates clutter, reduces food waste, and makes finding what you need simple and stress-free.

Hi, I’m Edom Clark, the creator and writer behind Taanzo. For the past five years, I’ve been exploring and writing about kitchen storage and home organization. My experience comes from both personal experimentation and hands-on observation — testing different storage systems, materials, and layouts to find what truly works in everyday homes. Over time, I’ve come to appreciate how small adjustments in storage can transform the way we cook, clean, and even enjoy time in the kitchen. Through Taanzo, I aim to share that knowledge in a way that’s honest, approachable, and genuinely useful.

