
Adaptive drawer systems are the key to a functional kitchen where multiple people cook together. If you’ve ever done the awkward kitchen dance, bumping into your partner while you both reach for the same spatula, you know the frustration. The countertops get cluttered, tempers can flare, and the joy of cooking together quickly evaporates. The problem often isn’t a lack of space, but a flawed organization method. Storing all knives in one block or all spatulas in one drawer simply doesn’t work when two or more workflows are happening at once. This guide will show you how to move beyond simple categories and design a truly adaptive drawer system built for the reality of a busy, shared kitchen.
My name is Edom Clark, and for years, I’ve been writing about and exploring the smartest ways to organize kitchen storage. But my knowledge doesn’t just come from research; it comes from over five years of hands-on work, helping families and roommates reclaim their kitchens from chaos. I’ve seen firsthand how a simple shift in thinking—from organizing by item to organizing by task—can transform a space. I once worked with a couple who were about to renovate because they thought their kitchen was too small. After we spent an afternoon redesigning their drawer workflows, they realized they didn’t need more space; they just needed a smarter system. That’s the power of an adaptive layout, and it’s more achievable than you think.
What Are Adaptive Drawer Systems (And Why Your Shared Kitchen Needs Them)?
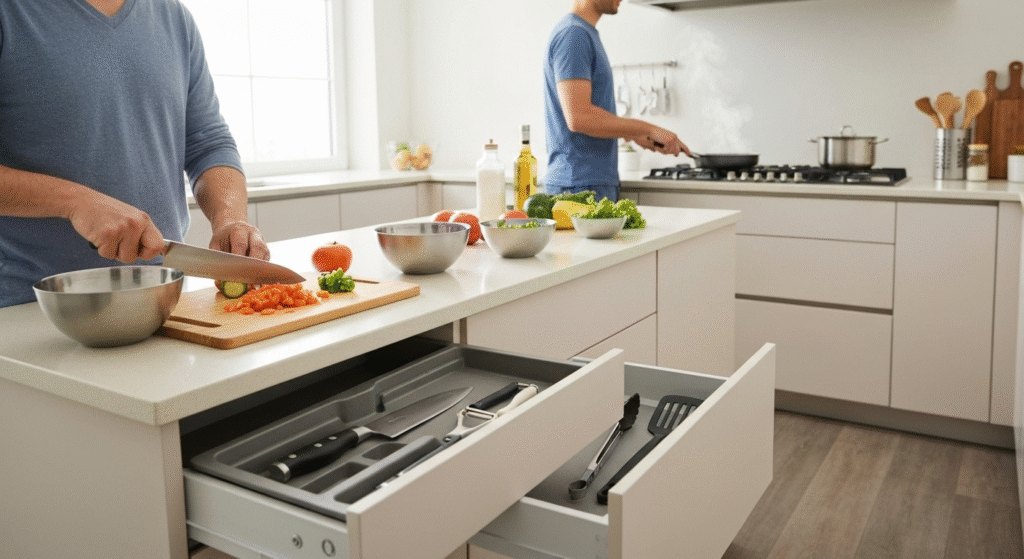
An adaptive drawer system isn’t a specific product you buy off a shelf. It’s a method of organizing your kitchen drawers based on flexibility, workflow, and individual roles. Instead of having a single, static “utensil drawer,” you create dynamic zones that serve the task at hand. This approach acknowledges that different cooking activities require different tools, and in a multi-cook home, those activities often happen at the same time. The goal is to create designated stations so that each cook has what they need within arm’s reach, without crossing into someone else’s workspace.
The Core Principle: Organizing by Role, Not by Tool
The most significant shift in creating an adaptive system is moving away from organizing by item category. You need to start thinking in terms of roles and zones. Ask yourself: who does what in our kitchen? Maybe one person is the primary dinner cook, another is the weekend baker, and a third person handles salads and drinks. Each of these roles has a unique workflow and a core set of tools.
Here’s what this looks like in practice:
- Traditional Method: One drawer holds all whisks, spatulas, and wooden spoons. The baker and the stir-fry chef are in constant conflict over this single drawer.
- Adaptive Method: The drawer next to the stovetop holds the high-heat spatulas, tongs, and tasting spoons needed for sautéing. A separate drawer, perhaps near the stand mixer, holds silicone spatulas, whisks, and offset icing knives for the baker. The tools are separated by their function, creating two independent work zones.
Benefits for the Multi-Cook Kitchen
Adopting this system brings immediate and noticeable benefits that go far beyond just being tidy. It addresses the real-world friction points of sharing a kitchen.
- Fewer Kitchen Traffic Jams: By creating distinct zones, cooks can stay in their primary area instead of constantly walking back and forth across the kitchen for tools.
- Reduced Mental Strain: No more asking, “Honey, where’s the garlic press?” When tools are organized by task, they are exactly where you expect them to be for that task.
- Increased Efficiency: Prep, cooking, and cleanup become faster because you aren’t wasting time searching for items or waiting for someone to move.
- A Sense of Personal Space: Each cook can have their “station,” which reduces stress and makes the experience more enjoyable and collaborative.
Designing Your Zones: The Foundation of an Adaptive System
Before you buy a single drawer divider, you need a plan. The foundation of any good adaptive system is a clear understanding of your kitchen’s functional zones and the roles of the people using them. Most kitchens naturally break down into a few key areas:
- Prep Zone: Where chopping, mixing, and measuring happen (often a clear stretch of counter space).
- Cooking Zone: The area around the stovetop and oven.
- Baking Zone: Often centered around a stand mixer or a dedicated counter space.
- Cleaning Zone: The sink and dishwasher area.
- Storage Zone: The pantry and refrigerator.
Your goal is to align the contents of your drawers with the activities that happen in these zones.
Identifying Your Primary Cooking Roles
Take a moment to think about your household’s daily and weekly routines. Be honest about who does what.
- The Daily Chef: Who cooks dinner most nights? This person needs primary access to everyday tools like chef’s knives, cutting boards, tongs, and spatulas.
- The Specialist Baker: Is there someone who bakes bread, cakes, or cookies regularly? Their tools (measuring cups, specialty spatulas, piping tips) can be grouped separately.
- The Prep Assistant: Does someone often help by chopping vegetables or making salads? They need their own set of prep tools.
- The Coffee/Tea Enthusiast: A dedicated drawer for coffee filters, tea bags, scoops, and stirrers can clear up a lot of counter clutter.
Last month, I worked with a family where the father was the “grill master” and the mother handled everything indoors. They constantly fought over tongs and thermometers. We solved this by creating a dedicated “Grill Prep Drawer” near the back door. It held his long-handled tongs, instant-read thermometer, grill brush, and basting brushes. This simple change completely separated their workflows and ended the nightly tool hunt.
Mapping Your Zones to Your Drawers
Once you’ve identified your roles and zones, it’s time for action. This process works best if you’re willing to make a bit of a mess first.
- Empty Everything: Start by emptying the contents of your primary utensil and tool drawers onto a table or countertop. This gives you a clean slate.
- Sort by Task, Not Type: Group items based on the activity they support. Put all the baking-specific items in one pile, all the stovetop tools in another, and all the vegetable prep gadgets in a third.
- Assign Drawers to Zones: Identify the most logical drawer for each zone. The drawer immediately next to your main chopping area should become the Prep Zone Drawer. The one closest to the stove is now the Cooking Zone Drawer.
- Place and Refine: Begin placing your task-sorted piles into their new dedicated drawers. You’ll quickly see where you have duplicates and where you might have gaps.
The Tools of the Trade: Modular and Adjustable Drawer Inserts
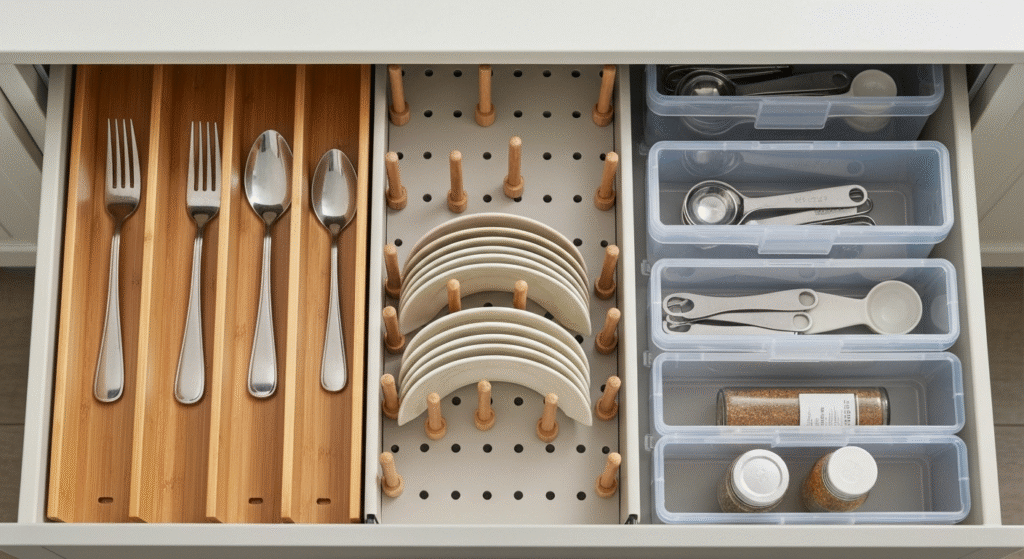
An adaptive system truly comes to life with the right hardware. Forget the flimsy, one-size-fits-all plastic trays. You need modular components that you can adjust as your needs change. These inserts provide structure and prevent your carefully curated zones from devolving back into a jumbled mess.
A Comparison of Drawer Organizer Types
Choosing the right type of insert depends on the drawer’s depth and what you plan to store inside. Each style has its own strengths and weaknesses.
| Organizer Type | Best For | Pros | Cons | My Pro Tip |
| Adjustable Dividers | Utensils, gadgets, spice jars | Highly flexible, can change layout easily for different tools. | Can sometimes shift if not secured, less ideal for heavy items. | Look for spring-loaded or tension-based bamboo dividers. They grip the drawer walls for a snug, custom fit that doesn’t slide. |
| Pegboard Inserts | Dishes, bowls, pans, lids | Excellent for securing odd-shaped or fragile items. Very secure. | Takes up more vertical space, requires more initial planning. | This is my go-to solution for deep pot and pan drawers. Storing lids vertically between pegs is a game-changer for visibility and access. |
| Customizable Bins | Small baking items, coffee pods, junk drawer contents | Can be removed and taken to the counter. Easy to clean. | Can slide around if the drawer isn’t full. Individual pieces can be costly. | Always place a non-slip drawer liner underneath individual bins. This simple step provides the friction needed to keep everything locked in place. |
| Two-Tier Organizers | Cutlery, small tools, flatware | Maximizes vertical space, effectively doubling storage capacity. | Can be difficult to access items on the bottom layer. | Use the top sliding tier for everyday cutlery (forks, spoons). The bottom layer is perfect for less-frequently used items like serving utensils or steak knives. |
The Power of Removable Trays and Caddies
To make your system truly dynamic, incorporate components that can be completely removed. This is especially useful for tasks that involve lots of small parts. Instead of bringing a dozen little items to the counter, you bring one organized tray.
- The Baking Caddy: Use a set of small, interlocking bins to hold sprinkles, food coloring, and piping tips. When it’s time to decorate cookies, you can lift the entire caddy out of the drawer and place it on the workspace. Cleanup is as simple as putting the caddy back.
- The Coffee Station Tray: A simple bamboo tray can be used inside a drawer to group your coffee filters, sugar packets, scoops, and stir sticks. In the morning, the first person up can pull the entire tray out and set it by the coffee maker.
Real-World Scenarios: Putting Adaptive Systems into Practice
Theory is great, but let’s look at how these concepts solve common kitchen frustrations. Here are a few scenarios I frequently encounter with clients.
Scenario 1: The Weeknight Dinner Duo
- The Problem: Two people are trying to make dinner after work. One is chopping vegetables for a salad at the island, while the other is sautéing chicken at the stove. They are constantly reaching into the same drawer for knives, peelers, and tongs.
- The Adaptive Solution:
- Prep Zone Drawer (at the island): This drawer is stocked with two paring knives, a vegetable peeler, a garlic press, and a small cutting board. It’s the dedicated space for the salad maker.
- Cooking Zone Drawer (by the stove): This drawer holds the high-heat spatulas, tongs, a wooden spoon, and a splatter guard. These are the tools for the person managing the stovetop.
- The Result: The two workflows are now parallel instead of overlapping. Each person has their own toolkit, eliminating the need to cross paths or wait for a specific utensil.
Scenario 2: The Baker and the Main Cook
- The Problem: A client was an avid baker, but her silicone spatulas always seemed to smell faintly of garlic from being stored next to the garlic press. Her whisks got tangled with ladles, and her delicate piping tips were lost in a sea of savory gadgets.
- The Adaptive Solution:
- We designated a set of drawers near her stand mixer as a dedicated Baking Station.
- One drawer was outfitted with adjustable dividers for her collection of spatulas, whisks, and bench scrapers. This separation immediately solved the garlic-scent issue—a small detail that made a huge difference to her enjoyment of baking.
- A second, shallower drawer was fitted with small, modular bins to organize cookie cutters by season, piping tips by size, and various types of sprinkles.
- The Result: Her baking became more streamlined and enjoyable. Everything she needed was in one place, pristine and ready for use, completely independent of the main dinner prep.
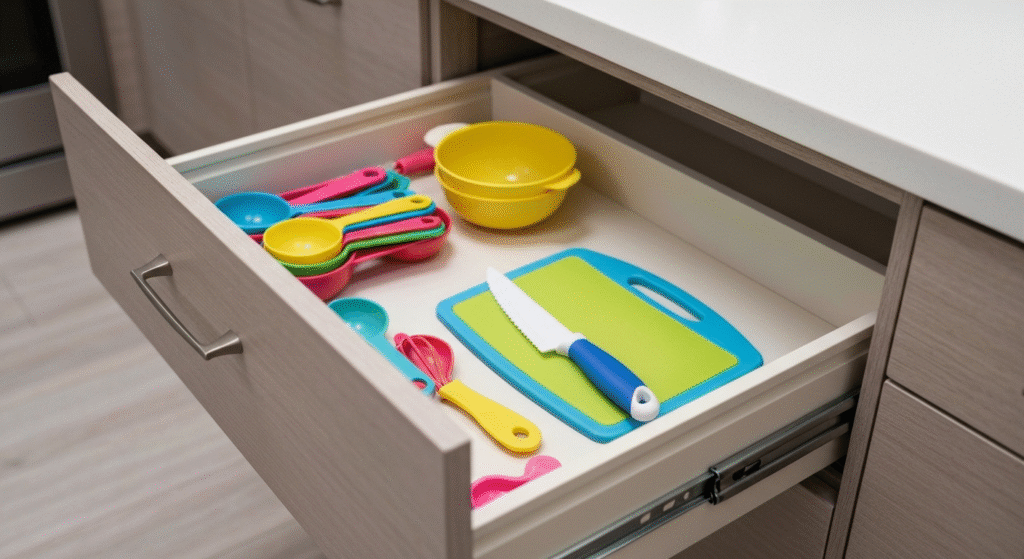
Scenario 3: The Family with Kids Helping
- The Problem: Young children want to help in the kitchen, but their enthusiasm often leads them to the drawer with the sharpest knives and most expensive tools.
- The Adaptive Solution:
- Create a “Kid-Safe Helper Drawer.” We chose a low, easily accessible drawer away from the stove.
- We stocked it with age-appropriate tools: a nylon safety knife for soft fruits, their own set of colorful measuring cups, a small whisk, and a few plastic mixing bowls.
- The Result: The kids now have a sense of ownership and responsibility. They know which drawer is “theirs,” and it naturally guides them away from the adult tools, ensuring safety and giving parents peace of mind.
Maintaining Your Adaptive System for Long-Term Success
An organized kitchen is not a one-time project; it requires a little maintenance to keep it functional. Fortunately, an adaptive system is much easier to maintain than a chaotic one.
The ‘One In, One Out’ Rule
To prevent the inevitable buildup of gadget clutter, adopt a simple rule: whenever a new kitchen tool comes into the house, an old or redundant one must go out. This forces you to be intentional about what you keep and prevents drawers from becoming overstuffed.
The Quarterly Drawer Reset
Habits change, and your kitchen system should be able to change, too. Every three or four months, take 15-20 minutes to quickly reassess your zones.
- Is the current layout still working for you?
- Have you picked up a new cooking hobby that needs its own space?
- Are there any tools that have migrated back to the wrong drawer?
A quick reset helps you adjust the dividers and bins to reflect your current needs, ensuring the system continues to serve you well.
Labeling for Clarity
When you first implement the system, a few simple labels can work wonders, especially for other members of the household. Use a simple label maker to mark sections (“Prep Tools,” “Baking Spatulas”) or bins. This reduces the learning curve and helps everyone build the new habit of putting things back in their designated home.
Frequently Asked Questions
What if my kitchen drawers are too small or deep?
For small drawers, focus on single-task zoning. One drawer might just be for “hot beverage prep.” For very deep drawers, use two-tier organizers or pegboard systems to take advantage of the vertical space and keep things from getting lost at the bottom.
Won’t creating separate zones mean I have to buy duplicate tools?
Sometimes, yes, and it’s often worth it. Having a second, inexpensive vegetable peeler or paring knife in a prep zone drawer can cost less than ten dollars but save you daily frustration. However, for more expensive items like a chef’s knife, you can create a central, known location (like a knife block) that is accessible to all zones.
How do I get my family or roommates on board with a new organization system?
Involve them in the planning process. Ask them about their biggest kitchen frustrations and show them how creating zones can solve those specific problems. When people feel their needs are being addressed, they are much more likely to adopt the new system. A quick tour and clear labels also help immensely.
Are expensive custom drawer inserts worth the money?
For a high-end, seamless look, custom inserts can be fantastic. However, you can achieve 95% of the same functionality with affordable and flexible options like spring-loaded bamboo dividers and modular bin sets. Start with adjustable options first; you can always upgrade later once you’ve perfected your layout.
Conclusion
Transforming your shared kitchen from a source of stress into a space of smooth collaboration doesn’t require a massive budget or a full-scale renovation. It requires a shift in perspective. By moving away from organizing your drawers by what the items are and toward organizing them by what they do, you create an adaptive system that serves the people using the space.
Designing your kitchen around roles and workflows—the prep assistant, the main cook, the baker—eliminates bottlenecks and makes cooking more efficient and enjoyable for everyone. Start small. Pick one drawer this weekend, map out its new purpose, and see how much of a difference a single, well-organized zone can make. You’ll be surprised at how quickly a little order can bring a lot of peace to the heart of your home.

Hi, I’m Edom Clark, the creator and writer behind Taanzo. For the past five years, I’ve been exploring and writing about kitchen storage and home organization. My experience comes from both personal experimentation and hands-on observation — testing different storage systems, materials, and layouts to find what truly works in everyday homes. Over time, I’ve come to appreciate how small adjustments in storage can transform the way we cook, clean, and even enjoy time in the kitchen. Through Taanzo, I aim to share that knowledge in a way that’s honest, approachable, and genuinely useful.

